Best practices for offboarding from InVision
- 12 Apr 2024
- 9 Minutes to read
- DarkLight
Best practices for offboarding from InVision
- Updated on 12 Apr 2024
- 9 Minutes to read
- DarkLight
Article Summary
Share feedback
Thanks for sharing your feedback!
Where to Start
This guide provides best practices to help you offboard from InVision:
- Step one. Determine what documents you need to export.
- Step two. Download your documents.
- Prototypes
- Export to a PDF: Best for Archival purposes where navigation of the prototype is not needed.
- Export to an Offline HTML: Best for prototypes you still need to navigate.
- Export to Screen Images: Best if a full resolution export of each screen is desired.
- Export Comments.
- Troubleshooting.
- Freehands
- Download to a PNG.
- Troubleshooting.
- DSM
- Save individual pages to a PDF: Best for when you need to copy/paste content.
- Export to an Offline HTML.
- Screen Capture Tools: Best for when you just need an archival version of your DSM.
- Prototypes
Step One: Determine what documents you need to export
Time required: 30-45 minutes.
Most of our customers only need to export 10-15% of the content that remains on InVision. We recommend starting the process by determining which documents have been created or viewed in the last six months. Note that depending on your company needs, you may want to lengthen or shorten this timeframe.
The best way to identify the documents to export is to use InVision’s audit log. Your company’s InVision owners, admins, and managers can access the audit log from InVision’s Home page.
Tip: Locate owner, admins, and managers of your account
To determine who sits in those roles on your team, navigate to the People page on the left sidebar and use the Role dropdown to filter by Owner, Admin, or Manager.
To identify the documents you need to export using the audit log:
Sign in to the InVision account you want to review.
In the lower-left corner, click the expandable team tray, and then select Audit Log. If the left sidebar isn't showing, hover over the InVision logo on the top left.
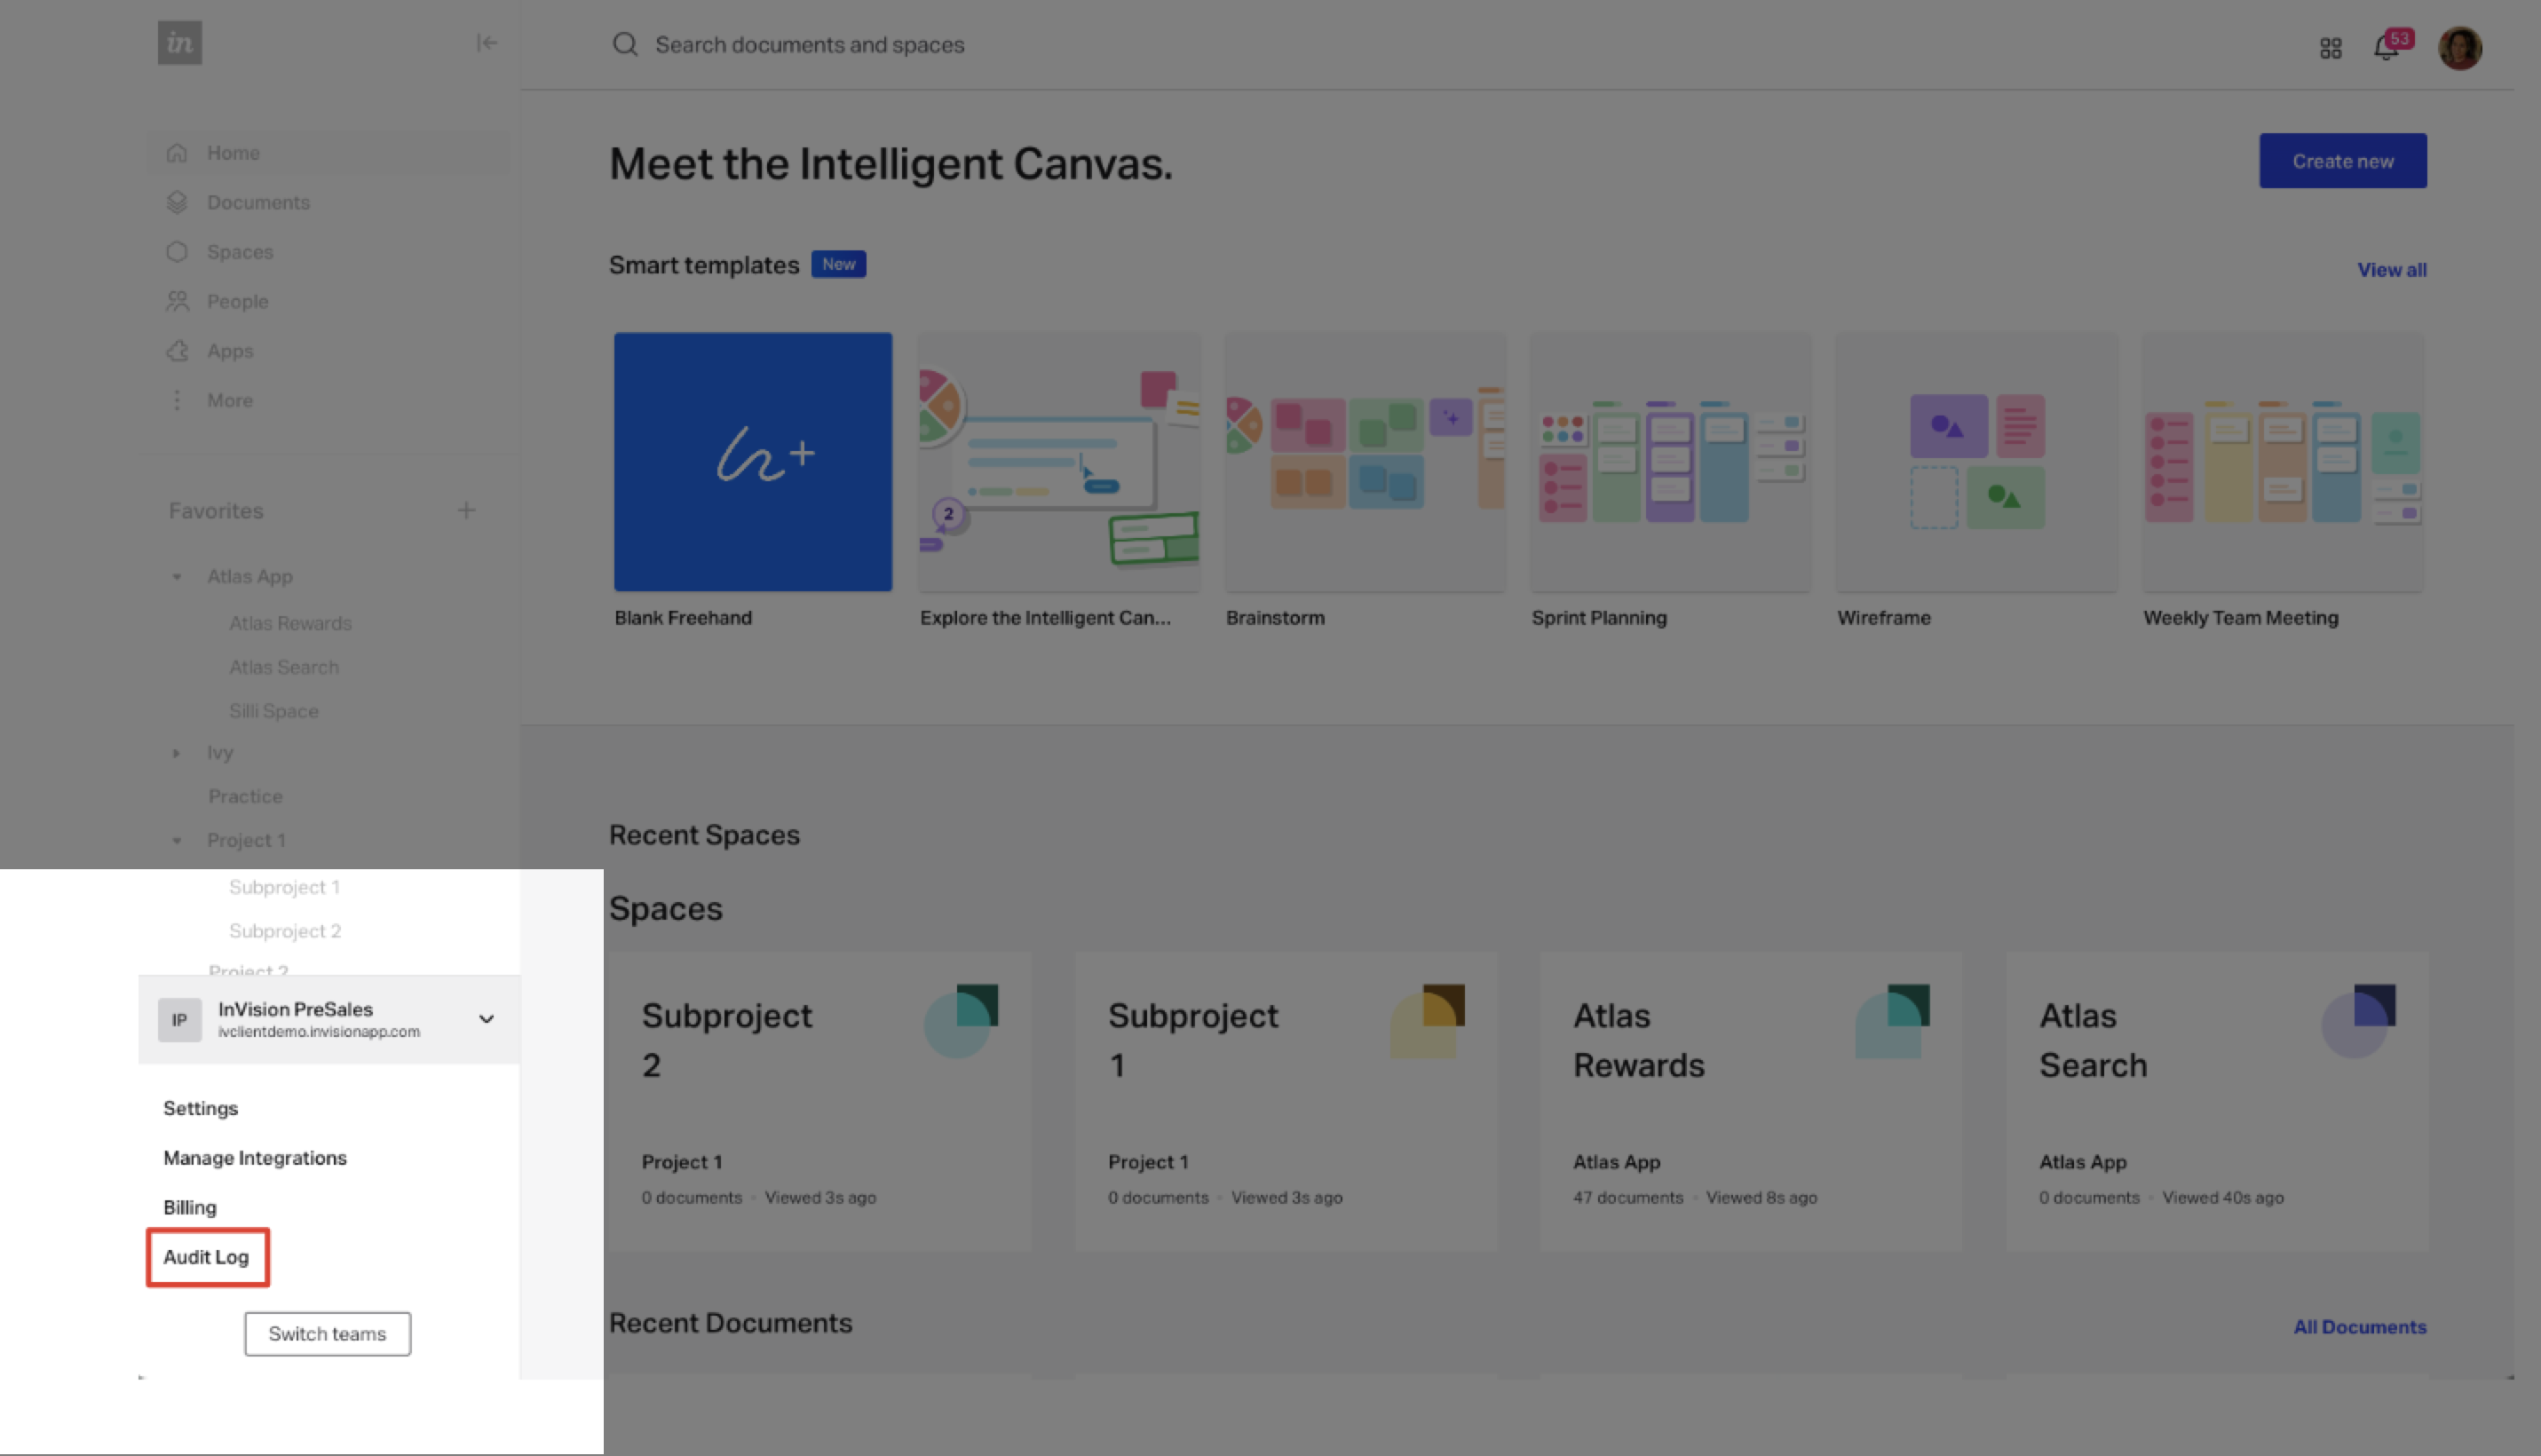
You will have the option to put in criteria for email (user), event, type and date. We recommend that you download the entire data set and filter in Excel or Sheets instead of using the criteria noted here.
Select Download on the top right to download the dataset of all documents from the last 365 days.

Select CSV or JSON. For most users, we recommend using CSV and importing the data to Excel or Google Sheets.


Once you have downloaded to Excel or Sheets, begin to sort and prioritize your data for download. We recommend you prioritize the download of the following types of documents:
- Active in the last six months
- Documents necessary for archival purposes
To identify documents active in the last six months:
First add a Filter to your data. Then based on your needs, you can specify unique criteria for your business but we suggest:
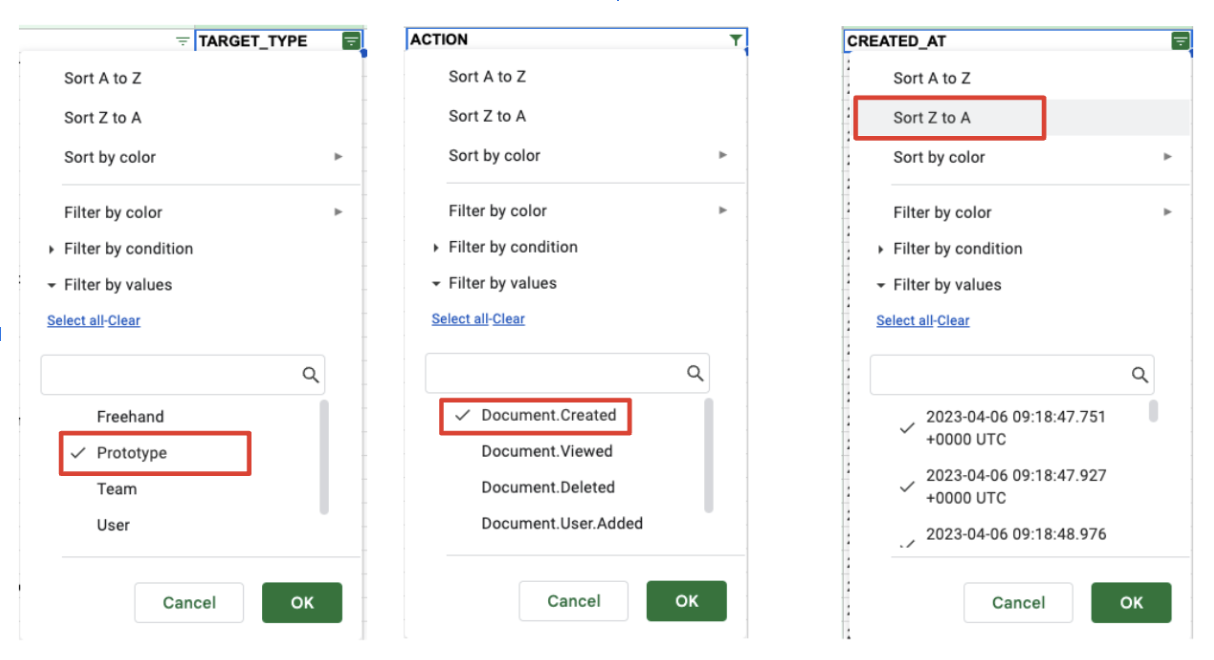
- Open the downloaded document in Excel or Sheets.
- Select your TARGET_TYPE. This will usually be Prototypes or Freehands. For some organizations you may also want to select Boards.
- Select the ACTION to pull. For recently created or viewed documents, we suggest selecting “Document Created” and “Document Viewed”.
- Sort the CREATED_AT by Z to A to sort your list from most recent.
- Pick a time period to cut your list based on your sorted CREATED_AT field. Again, we recommend six months.
This will provide a list of documents that were active or viewed in the last six months.
To identify documents necessary for archival purposes
From your download, you also have a full list of your InVision documents for the last year if you remove the filters.
To identify documents that are necessary for archival purposes, we recommend reviewing the TARGET_NAME for documents that may need archiving or filtering by ACTOR_EMAIL for individuals who would create documents that need to be archived.
Once you have your short list of documents that need to be archived, we suggest following one of these paths:
- Download the documents yourself as the admin or assign an individual to download. You can use the spreadsheet that you have just created to track progress/completion.
- Send the list of documents that need to be archived to the users that created them and have them archive the documents as needed. You can use the spreadsheet that you have just created to track progress/completion.
Now that you have your prioritized list and process on how you are going to proceed with the archiving of your InVision documents, let’s show you the options on how to download.
Step Two: Download your documents
Time required: 2-3 minutes per document.
There is no bulk export option for prototypes, boards, or DSM available. Note that our Support team can't export documents on your behalf. We recommend starting early to avoid any issues.
If you have an existing Miro paid account or are purchasing a new one, we have a bulk tool to move your Freehand content. Otherwise there is no option to bulk download freehands. Please reach out to your Miro account team or InVision Support team for details on the Freehand to Miro migration tool.
Please note that it's not possible to download documents from public share links. Share links will no longer work for any type of InVision document after December 31, 2024.
Prototypes
There are three formats to download your prototypes (see more information and differences in the section "More information about different export types"):
- Export to PDF
- Export as offline prototype (HTML)
- Export screen images (.zip)
For all download options, there is a 2GB size limit. For larger files, see the "Troubleshooting" section below.
In addition, you can download your comments for a given prototype (.csv).
To export a prototype:
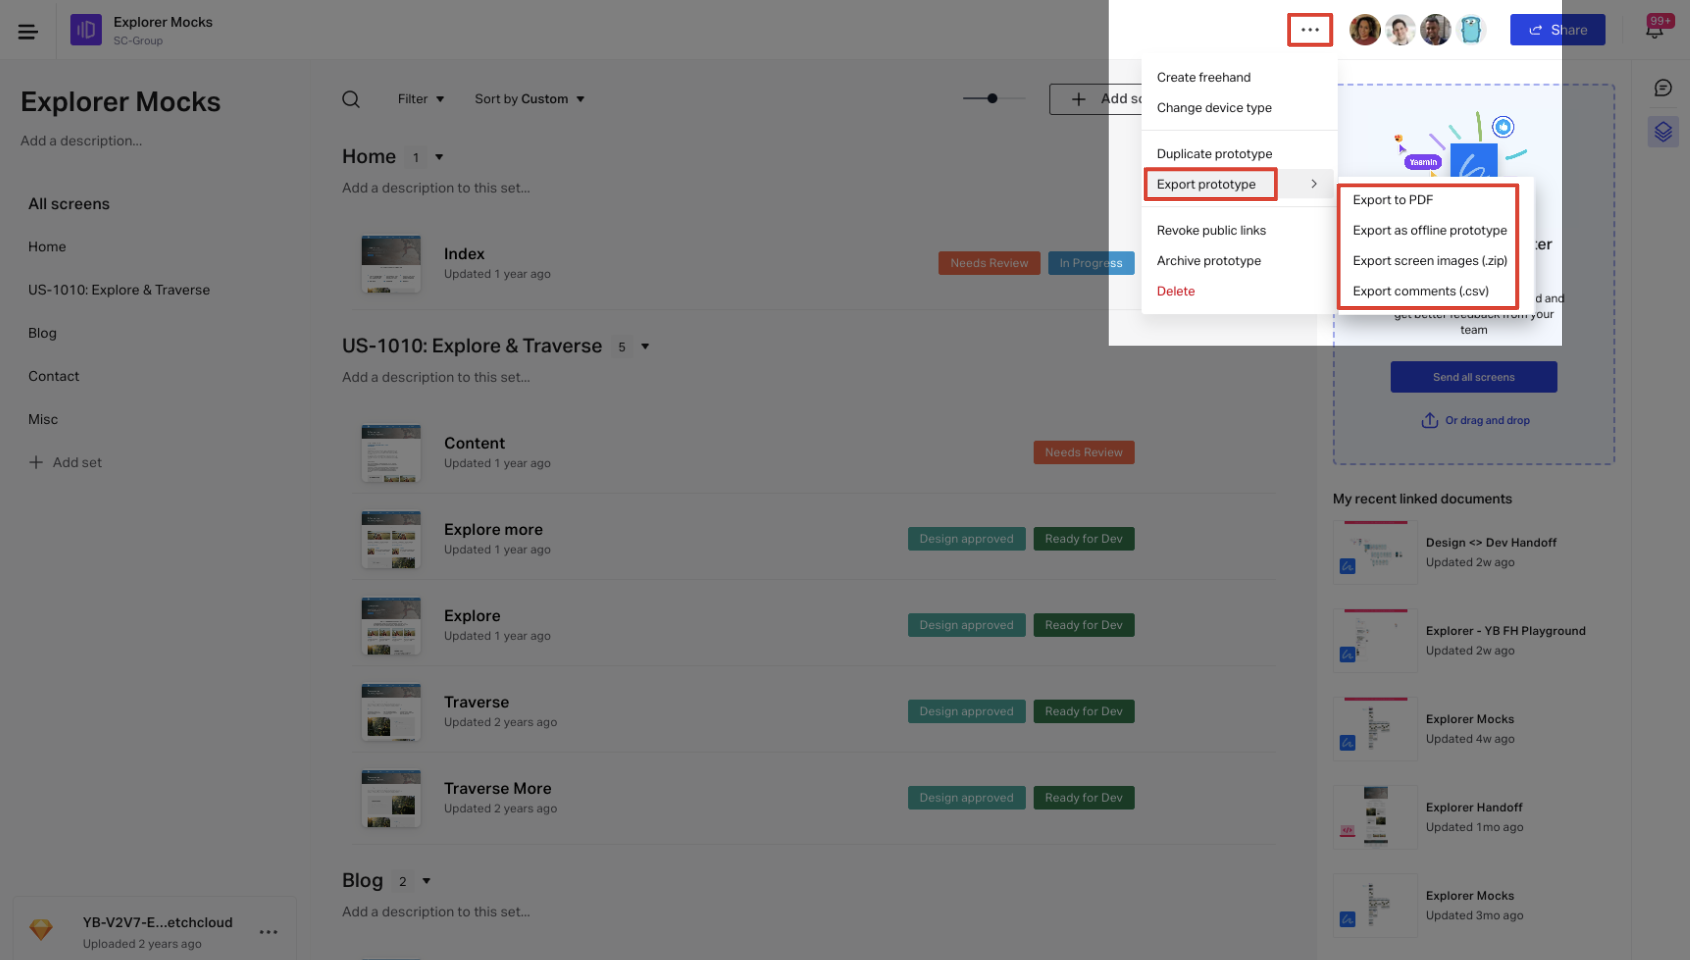
- Open the first prototype on your prioritized list (see Step One).
- At the top right of the page, select the ••• (more) menu.
- Select Export prototype, and then select your preferred export type.
- A new window will open, and the file will download to your computer.
More information about different export types
Export to PDF
Best for archival purposes where navigation of the prototype is not needed.
This option downloads all the prototype screens to a PDF file. You can't click through the hotspots or edit the prototype but can view every screen.
In addition, landscape orientation and password protection aren't supported.
Export to HTML (offline prototype)
Best for prototypes you still need to navigate
This option downloads your prototype to an HTML offline prototype that you can navigate as though it was still on the InVision platform. You will not be able to edit these files, just view.
To open the offline prototype:
- Open the .zip file that you downloaded.
- Double click on the HTML file. The prototype opens on your default browser and you can navigate it as if you were on InVision.
Windows users need to unzip the downloaded file to properly view the offline prototype.
You can't edit these offline prototypes.
Offline prototypes access after December 2024
You will be able to access offline prototypes after December 31, 2024. To test, simply turn off your internet connection and you will be able to access and navigate.
Export to screen images
Best if you need a full resolution export of each screen.
This option downloads each screen of your prototype as a .png file, packaged into a .zip file. As these are flat images you will not be able to edit these prototypes.
Export comments
Comments in a prototype aren't downloaded with the other export types. If you need to keep comments added to a prototype, you can download them as a .csv file.
You have the option to configure what comment types and status you export and the field delimiter choice (how you want to separate the fields in the .csv file).
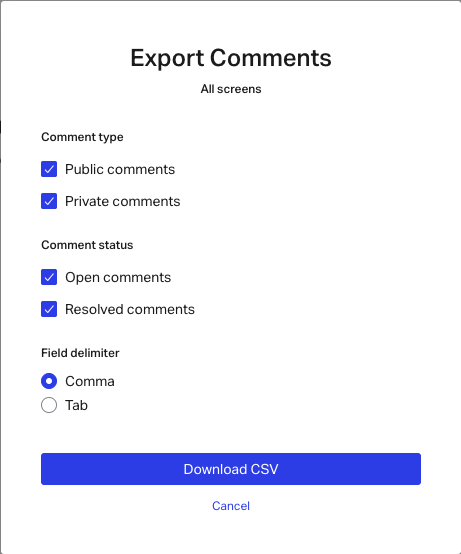
We highly recommend making sure the downloaded .csv file with comments has the same naming format as the downloaded prototype so it is easy to identify which comments belong to which prototype.
The downloaded .csv file will include the following fields:
- Prototype: name of the prototype the comment is from.
- Screen name: name of the screen within the prototype that the comment is from.
- Screen file: name of the file if you've also chosen to Export screen images (.png).
- Archive status: an indication of if the screen is archived or not.
- Conversation status: the status of the comment. Open or resolved.
- Comment type: public or private.
- Commented by: email address of who created the comment.
- Commented at: date and time when the comment was made.
- Comment: content of the comment.
Troubleshooting
I can't download my prototype
There's a 2GB size limit for prototype exports. If you're running into download issues, we recommend trying to break up your prototype and trying to export again.
To break up your prototype:
Select a smaller group of screens.
Select Send to.
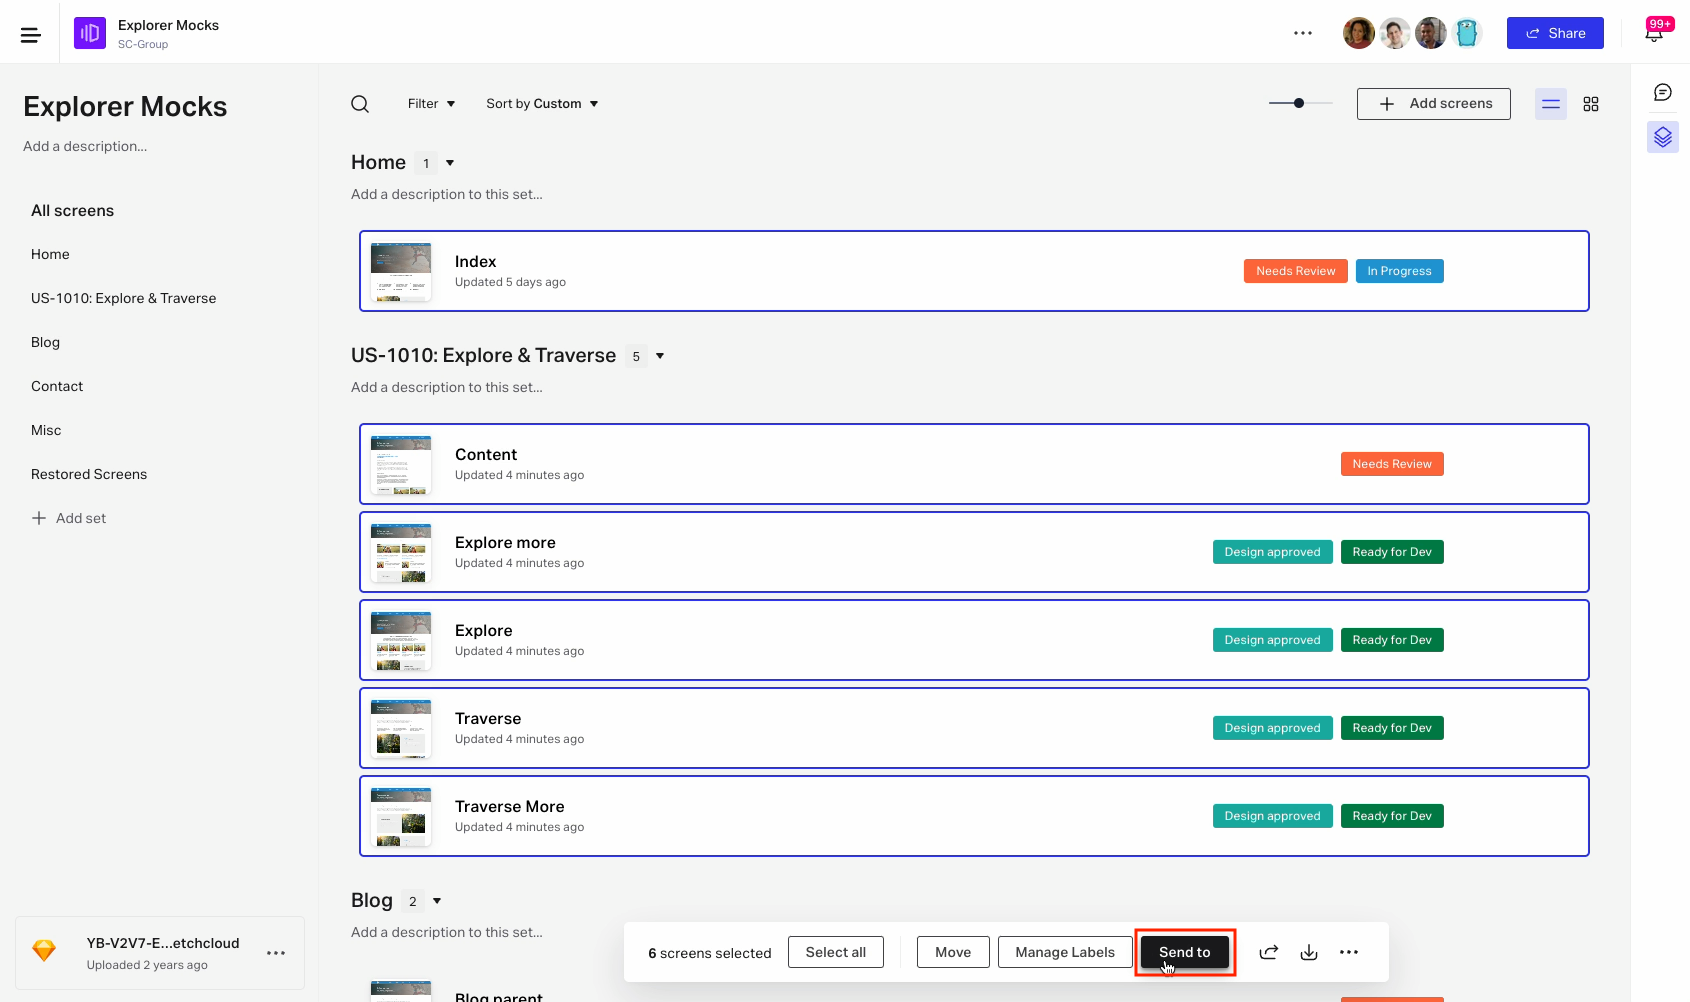
Select Create New Prototype.
Add a name and select Create.

Once you’ve broken up your prototype, follow the steps above to export your new prototypes in your desired format.
Freehands
Miro migration tool
If you have or will be contracting with Miro, a migration tool is available. Please contact your Miro representative for details.
You can only export freehands to PNG files.
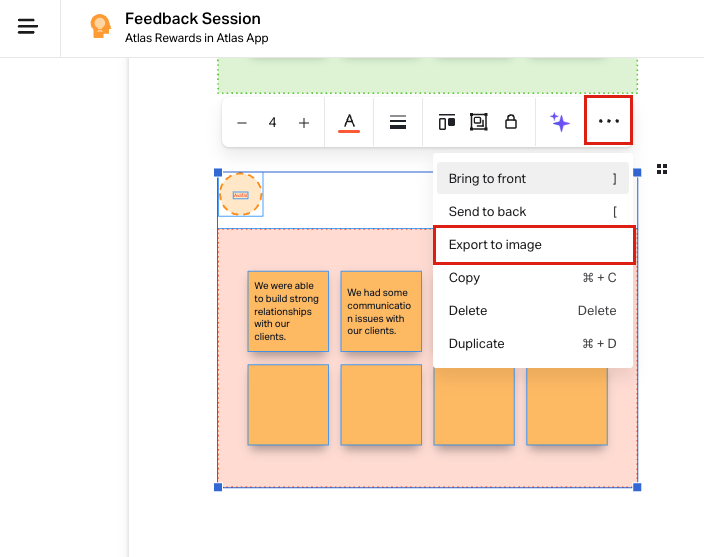
To export a freehand as a PNG:
- Sign in to your InVision account and open the freehand you want to export.
- At the top right of the page, select More (•••).
- Select Export to image.
A PNG image of the freehand is downloaded.
To export a portion of a freehand:
- Sign in to your InVision account and open the freehand.
- Select one or more items (click, drag and select).
- In the contextual menu, select More (•••).
- Select Export to image.

A PNG image with the selected items is downloaded.
Troubleshooting
The downloaded image is blurry
If the downloaded PNG is blurry, we recommend exporting sections of the Freehand as noted above and downloading individual sections.
If you have very small content in your Freehand, it can also be helpful to enlarge it before exporting to a PNG.
DSM
There are a few workarounds to download your DSM content (see differences below):
- Export icons
- Export design tokens
- Save individual pages to a PDF
- Screen capture tools
Export icons
If you have documented .svg icons within DSM, it's possible to download a single .svg icon or all icons.
For more information on how to do this, read our support article: Downloading icons in DSM.
Export design tokens
If your team utilized design tokens within DSM, it's possible to download all token data as .json in a .zip file:
- Navigate to your tokens page in DSM.
- Select the menu option in the left sidebar, and select Download JSON (ZIP).
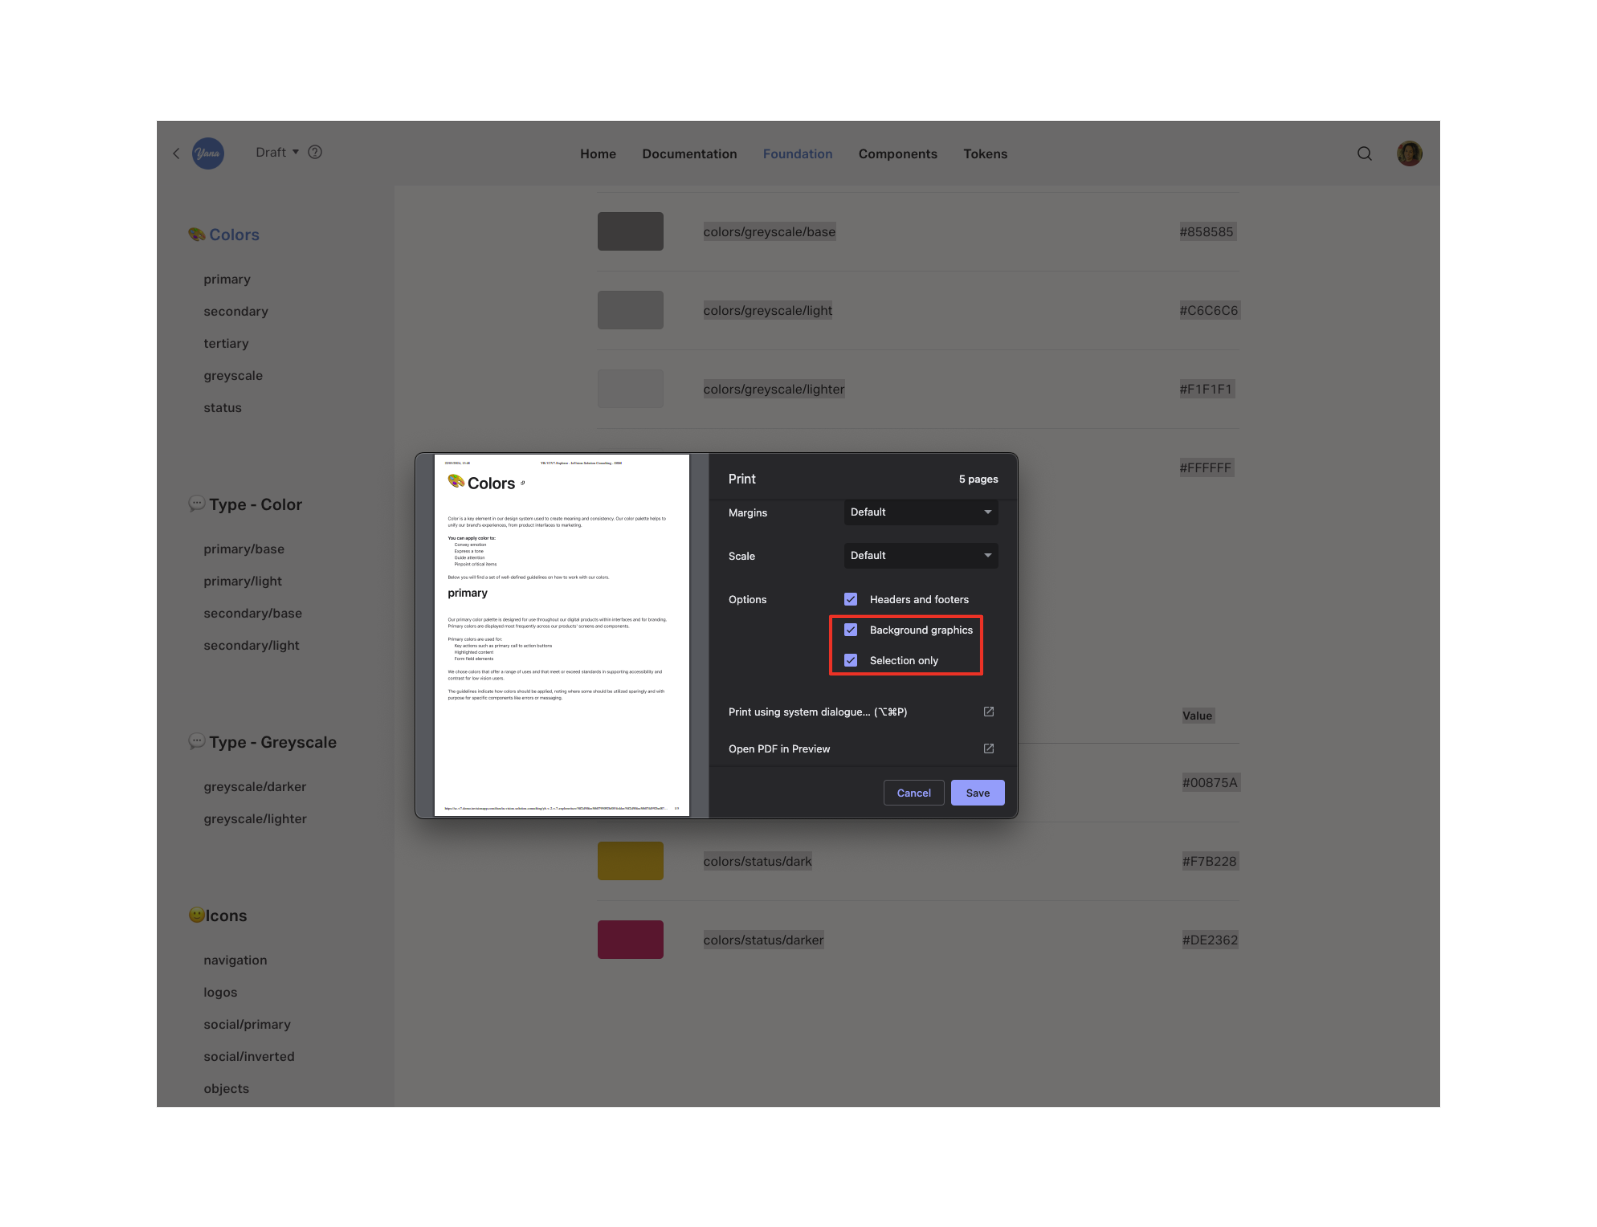
Save individual pages to a PDF
Best for when you need to copy/paste content.
As a workaround for saving a single DSM page, you can export the content to a PDF file by utilizing your browser’s print capabilities.
- Highlight the text content of the page.
- Press
Ctrl+Por⌘+Pto open the Print dialogue. - Select Save to PDF.
- Select Background Objects and Selection Only.
- Select Save.

Screen capture tools
Best for when you just need an archival version of your DSM.
When you just need your DSM documentation for archive purposes, you can try to use various screen capture tools available for your browser such as those for Google Chrome. While each browser is different, in Google Chrome, go to the Chrome Web Store and search for ‘screen capture’. Make sure you're allowed to add any extensions before you add.
If you're using this option to export, we recommend setting your DSM to public while you're exporting and being logged out so the edit bar for DSM doesn't appear in the screenshots.
You could also look to utilize your device's default screen capture capabilities. On a Mac use ⌘+Shift+3 to screenshot the entire visible window, or ⌘+Shift+4 to screenshot a selection of the visible screen. On Windows you can utilize the snipping tool to take screenshots.
Was this article helpful?