Craft prototype plug-in
- 02 Feb 2023
- 7 Minutes to read
- DarkLight
Craft prototype plug-in
- Updated on 02 Feb 2023
- 7 Minutes to read
- DarkLight
This Craft tool is no longer available as of Craft version 1.3.0.
Article Summary
Share feedback
Thanks for sharing your feedback!
Warning: The Craft prototyping plug-in is no longer available as of Craft version 1.3.0. Sketch's native prototyping is replacing the plug-in. Read Convert Craft prototypes to Sketch native prototyping for more information.
With Craft Prototype, you can build interactive prototypes right within Sketch. Once you’ve created an interactive experience, use Craft Sync to publish your designs straight to InVision—where you can start sharing your ideas and capture feedback within minutes.
Getting Started
To use Prototype, install or update Craft and sign in to Craft Sync.
Once signed in, you can start syncing your screens and hotspots to your InVision prototype(s). Select which prototype you’d like to sync your screens to by choosing your prototype from the list. Use the search field to find it by name, or create a new prototype. Learn more about using Craft Sync here.
Create a new prototype
To sync screens to a new prototype:
- Click the Craft Sync icon (
.png) ).
). - In the module that appears, click inside the text box and choose Create prototype.
- Enter a new prototype name (you cannot use the name of a pre-existing prototype for a new prototype).
- Select the device type.
- Click Publish.
.png) ).
).Prototype mode
At the bottom of the Craft panel, click the Prototype icon (![]() ), or press X at any time to switch to prototype mode. In prototype mode, you will see all created hotspots appear by default. Clicking on a layer while in prototype mode will only show the hotspots tied to that artboard. You can exit prototype mode by pressing X again or clicking the prototype icon.
), or press X at any time to switch to prototype mode. In prototype mode, you will see all created hotspots appear by default. Clicking on a layer while in prototype mode will only show the hotspots tied to that artboard. You can exit prototype mode by pressing X again or clicking the prototype icon.
Creating Links
To create links to other artboards in your InVision prototype:
- Select an artboard layer or group and press the K key.
- Move your cursor to the new artboard you’d like the hotspot to trigger.
- Select the link type, artboard, and gesture.
- If you want, check the box Maintain scroll position after click.
- Click Add Link.
You should now notice an arrow going from your originating artboard to the destination artboard.

Here are the available gestures:
Desktop
- Click
- Hover
Mobile
- Tap
- Double tap
- Swipe right
- Swipe left
- Swipe up
- Swipe down
There are 5 ways to link layers and screens together:
- Link to a screen or artboard
- Link as overlay
- Link to a position on the screen
- Link to an external URL
- Link back/close
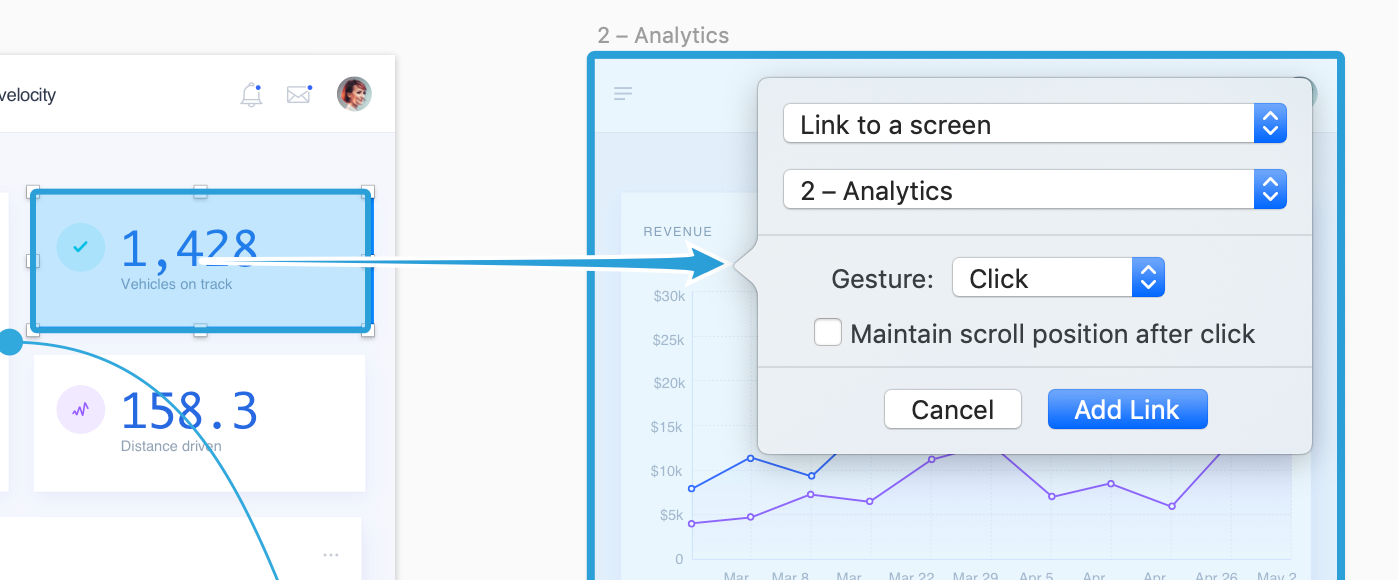
Link to a screen or artboard
When creating a link, the default setting is Link to a screen.
To link to a screen:
- Select the originating layer or group and press C.
- Click the destination artboard.If the destination artboard is on a separate page, navigate to the top of the canvas and click Artboard.
- In the first drop-down, select Link to a screen.
- In the second drop-down, select a destination artboard.
- Select a Gesture.
- If you want, check the box Maintain scroll position after click.
- Click Add Link.


It is possible to link to screens or artboards on separate pages in the same Sketch file. This is particularly helpful if you need to link from a master symbol—note that you can link from a symbol in Craft Prototype, but it's not possible to link to a symbol. To learn more, check out this article: In Craft Prototype, how do I connect artboards that exist on separate pages?
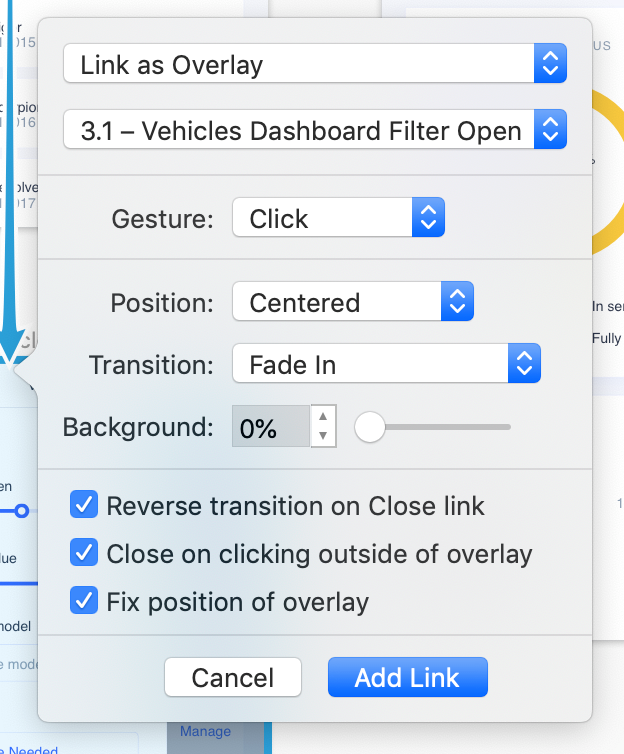
Link as Overlay
An overlay is a link type that lets you link to another screen as an overlay, rather than as a separate destination screen.
To link as overlay:
- Select the originating layer or group and press C.
- Click the destination artboard.
- In the first drop-down, select Link as Overlay.
- Choose a Gesture, Position, and Transition.
- Set the Background transparency.
- If needed, toggle on additional options:
- Reverse transition on Close link: If selected, your transition will animate on both open and close of the overlay.
- Close on clicking outside of overlay: If selected, a click outside of your overlay will return your user to the screen underneath.
- Fix position of overlay: If selected, your overlay will not scroll along with the rest of the page.
- Click Add Link.

Unlike Build mode, which dynamically displays only the hotspot setting options that are applicable to the prototype device type (i.e., desktop or mobile), Craft Prototype currently displays all link setting options whether or not they are applicable to the prototype device type. Therefore, it's important to address a couple of notable differences between the way overlays work in Craft Prototype and InVision Build mode:
| Feature | InVision Build mode | Craft Prototype |
| Hover gesture | Only displayed as an option for the overlay hotspot trigger if you have selected desktop as the prototype device type | Always displayed as an option for the overlay link gesture This can cause confusion if used in a mobile prototype, as the hover link gesture would have no effect once synced to InVision. |
| Stay on target screen | Only displayed as an option for the overlay hotspot if you have selected Hover as the trigger | Always displayed as an option for an overlay link with Hoverselected as the gesture This setting has no effect unless you select Desktop (Web) in the Select device type dropdown menu when syncing to InVision. |
Position on screen
To link to a specific position on the same artboard:
- Select the originating layer or group and press C.
- Hover over the same artboard to display a horizontal line. This line represents the destination point.
- Click to set the position.
- If you want, check the box Smooth scrolling transition.
- Click Add Link.
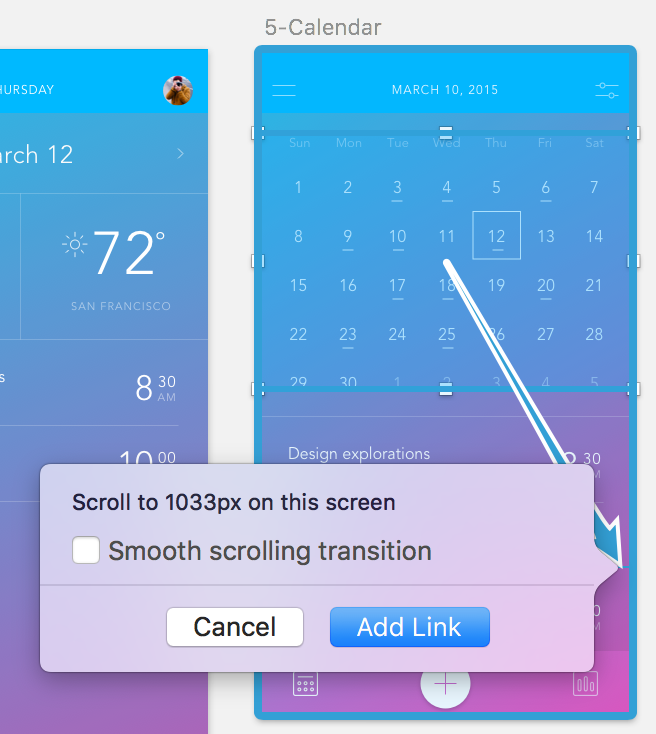

You can currently only link to a position on the same artboard.
External link
To create a hotspot to an external link:
- Select the originating layer and press C.
- At the top of the canvas, click External URL and enter the destination of an external web page.Note: The URL must begin with
http://orhttps://. - To open the link in a new browser window when clicked, check Open in new window.
- Click Add Link.

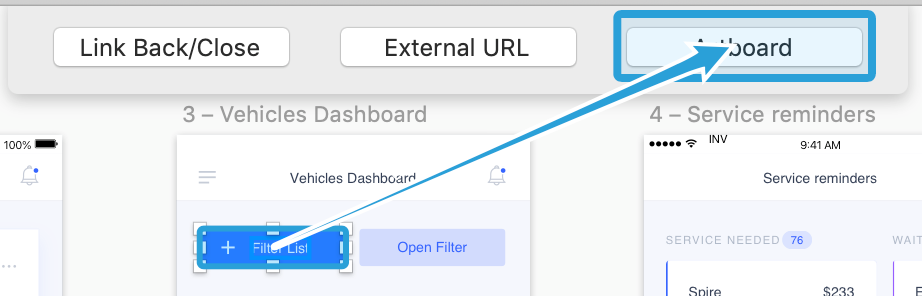
Link back or close
To link back to a previous screen or close the current screen:
- Select the originating layer or group and press C.
- At the top of the canvas, click on Link Back/Close
- If you want, check the box Maintain scroll position after click.
- Click Add Link.

Editing or removing links
To edit a link:
- To show hotspots, press X.
- Navigate to the originating screen and click the link’s circle.
- Make your changes and click Save.

To delete a link:
- To show hotspots, press X.
- Navigate to the originating screen and click the link’s circle.
- Click Remove.

To delete multiple links at once:
- Select all the layers or artboards that contain links you want to delete.
- In the Sketch menu bar, click the Craft menu, hover over Prototype, and click Delete Selected Hotspots.
.gif)
.gif)
Previewing your prototype with Craft Player
Now that you've created an interactive prototype, you're ready to see it in action.
To preview your prototype in Sketch:
- Click the Craft Player icon (
.png) ).
). - In the Player modal, click, scroll, and interact with the prototype as needed.To navigate screens without using a hotspot, press the left and right directional arrows on your keyboard.
.png) ).
).Craft Player User Interface
.gif)
At the top of the Player, you'll find three items:
- Artboard dropdown list: Click the dropdown list to change the artboard currently shown in the Player.
- Settings: Click the Settings icon (
.png) ) to reveal an extensive list of all available device types you can select as your viewport size for the Player.Note: When you first open the Player, the viewport size is assigned automatically, based on your artboard sizes.
) to reveal an extensive list of all available device types you can select as your viewport size for the Player.Note: When you first open the Player, the viewport size is assigned automatically, based on your artboard sizes. - Sync icon: Click the Sync icon () to open the Craft Manager modal and publish your prototype to InVision.
.png) ) to reveal an extensive list of all available device types you can select as your viewport size for the Player.
) to reveal an extensive list of all available device types you can select as your viewport size for the Player.Craft Player viewport sizes
You will find the following device types available as viewport sizes for the Player:
- Phone
- iPhone XS Max
- iPhone XS
- iPhone XR
- iPhone 8 Plus
- iPhone 8
- iPhone SE
- Galaxy S8
- Galaxy S7
- Tablet
- iPad Pro
- iPad
- Nexus 10
- Nexus 7
- Watch
- Apple Watch Series 4 44mm
- Apple Watch Series 4 40mm
- Apple Watch Series 3 42mm
- Apple Watch Series 3 38mm
- Android Watch Square
- Android Watch Round
- Desktop
- Apple TV
- 15" MacBook Pro
- Desktop HD - Desktop
Layout options & other settings
The additional settings for Craft Player differ slightly based on the device type you have selected:
- Rotate to Landscape: Available for phone or tablet device types only, click this option to preview the prototype in landscape layout. Or use the keyboard shortcut (Shift + Command + R) to rotate between landscape and portrait.Note: If in landscape layout, you’ll notice this option in the Settings menu says Rotate to Portrait instead.
- Reset Scale: Click this option (or use the keyboard shortcut Control + Option + K) to reset the scale of the Player.
- Reset Device: Click this option (or use the keyboard shortcut Control + Option + D) to reset the device type based on the size of your artboards.
- Reload Sketch File: Click this option (or use the keyboard shortcut Command + R) to refresh the Player.
Syncing to InVision
To sync your prototype to InVision:
- Select the artboard/s you want to publish.
Note: To publish all artboards on the Sketch page, ensure that you have no artboards selected before proceeding to step 2.
- In the tools panel on the right side of the workspace, click the Craft Sync icon (), which will prompt the Craft Manager dialog to open.
- In the Craft Manager dialog, click the Select or create a prototype field, enter a name to select the prototype you want or click the Create prototype button, and select the device type from the drop-down list.
- If you’re creating a new prototype, click the blue Publish button. If you’re syncing changes to a previously created prototype, click the blue Update button.Note: You will then see the Prototypes tab, where you can view the publishing progress indicator.
Hotspots created in InVision cannot currently be synced back to Sketch. Any hotspots created in Prototype and synced with InVision in the same location on an artboard will create overlapping hotspots. Remove the original hotspot in InVision to continue syncing links with Prototype.
Please be aware that any artboards you link or transitions you create with Sketch's built-in Prototyping feature will not appear in InVision.
Sharing your prototype
Once you’ve synced your hotspots and artboards with Craft Sync, open the prototype in InVision and add collaborators or create a public share link.
Was this article helpful?