- 19 Sep 2023
- 8 Minutes to read
- DarkLight
Working with Specs in InVision V7
- Updated on 19 Sep 2023
- 8 Minutes to read
- DarkLight
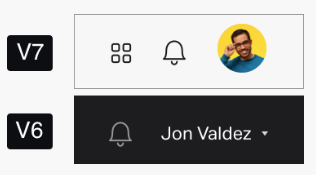
This article provides answers for InVision V7 To confirm your version, check the upper right corner of your dashboard. |  |
The latest document type in InVision V7, Specs are tailored for one job only—design to development collaboration.
By syncing artboards as a spec, rather than a prototype, designers can streamline collaboration efforts and send only the screen designs that are ready for development. Each design spec delivers exactly what’s relevant to developers and provides the context they require from designers, all in a document focused solely on the details the developer needs to take the spec from design to reality.

Get familiar with Specs
Once the designer has published a spec via Craft Sync and completed prepping it in InVision V7, the developer and other collaborators can use the spec to do the following:
- Review the project overview
- Collaborate:
- See collaborative comments on each screen—without leaving the canvas
- Work alongside colleagues in the spec at the same time—without overwriting one another's work
- Give and receive feedback via comment threads
- Inspect screens
- Connect the spec document to a specific Jira ticket
Create a spec
There are different ways to create a new spec:
- Publish a spec via Craft Sync in Sketch
- Create a spec from the Homepage, the Documents landing screen, or a group
Publish a spec via Craft Sync
To sync artboards from Sketch to InVision V7 to a new or existing spec:
- In Sketch, select the artboards you want to sync, and then click the Craft Sync icon (
.png) ).
). - In the Craft Manager modal, below Publish To, click Spec.
- Click either Create new and enter a name for the spec, or click Select existing and select the spec you want to sync to.
- Choose either All artboards on page or Selected artboards, and then click the Advanced dropdown and update the settings as wanted.
- Click Publish.
Create a spec from the Homepage, the Documents landing screen, or a group
To create a spec from the Homepage, the Documents landing screen, or a group:
- Sign in to InVision V7.
- Start from the Home page, the Documents landing screen, or open a group.
- In the upper-right corner, click + Create and select Spec.
- In the Name your spec field, enter a name and click Create.
After creating a spec in InVision, you'll need to add screens via Craft Sync.
Tip: Convert your specs to Freehand for cross-functional collaboration. Read this article for more information: Convert boards and specs to Freehand.
Access a spec
Once a spec has been published to InVision V7 via Craft Sync, you can access it with the rest of your InVision V7 documents. You can also access a spec on InVision V7 from within the Craft interface.
Open a spec while working in Craft
There are two ways to open a spec via Craft:
- In Sketch, click the Craft Sync icon (
.png) ), click the Select existing dropdown, select the spec you want to open, and then click Open on web.
), click the Select existing dropdown, select the spec you want to open, and then click Open on web. - In the Mac menu bar, click the Craft Manager icon (
.png) ) and then click the name of the spec you want to open.
) and then click the name of the spec you want to open.
Open a spec while working in InVision V7
There are three places to access a spec while working in InVision V7:
- On the Homepage, under Recent documents (if you have already viewed the spec)
- On the Documents page.
To see only specs on your Documents page, click the Specs filter option just above the document thumbnails on the right.
- In a specific group (if the spec has been moved to a group)
Add a spec overview
The overview gives developers and other viewers the quick, high-level context needed to understand the purpose of the given spec document.
To add an overview to your spec:
- Sign in to InVision V7 and open a spec.
- In the right panel, below the Overview tab, click the text field.
- Add your overview and make any necessary formatting changes.
Any time you need to edit the spec overview, repeat the steps above.
 (specs-text-wysiwyg-add-screen-anchor.png), and drop an anchor on the corresponding screen:
In-line editing quill
While writing or editing your spec overview, selecting text will reveal a contextual, editing quill so you can format the text:
Icon | Name | Shortcut | Description |
|---|---|---|---|
 | Styles dropdown | N/A | Apply one of six styles:
|
 | Bold |
| Apply bold font. |
 | Italic | ⌘I | Apply italic font. |
| Strikethrough | N/A | Strikethrough the text. |
| Link | N/A | Add a link. |
| Screen anchor | N/A | Add an anchor link to a specific screen. |
Download assets
Before using Craft Sync to publish your spec from Sketch to InVision V7, you can enable assets for download, which will allow developers and other collaborators to grab the assets they need directly from the spec file.
To download assets that were included when syncing from Sketch to a spec file:
- Open the spec.
- In the right panel, next to Overview, click the Assets tab.
- Mouse over an individual asset and click the Download asset icon (
 ), or click the Download all assets button at the bottom of the list.
Get familiar with Spec's tools
Above the canvas, you'll see the More menu icon (•••), collaborators' avatars, and the Share button.
More menu
Click the More icon (•••) to archive or delete a spec.
Collaborators
If there are four or fewer people collaborating on the spec, all four of their avatars will be visible above the canvas, and you can hover over each one to display the person's name.
If there are more than four people collaborating on the spec, hover over the +5 icon [numeral will vary based on the number of collaborators] to display the names of all other collaborators on the spec.
Share
Click the Share button to invite collaborators to join the spec or to share the spec via a document link—recipient must belong to your InVision V7 team.
Learn the details about sharing V7 documents.
Additional tools
In addition to editing the spec document name and overview, you'll use the tools below to collaborate and work on your spec. Use this table for a quick overview of each tool.
Icon | Tool Name | Shortcut | Description |
|---|---|---|---|
| Selector |
| Select objects—screens, comments, or images—to edit or move. |
| Comment |
| Add comments or notes to screens without leaving the Specs canvas. |
Image | I | Add images to the canvas. | |
| Text |
| Add notes directly to the canvas to detail how the design should function. |
| Connections |
| Show or hide connections (hotspots) among screens. |
| Shortcuts |
| View keyboard shortcuts for Specs. |
| Zoom | ⌘- or ⌘+ | Click the - (minus) button to zoom out. Click the + (plus) button to zoom in. |
Align and distribute items
To re-organize or refine the alignment of screens, text annotations, or images:
- Open the spec and select the appropriate screens.
With two or more screens selected, a contextual menu will open at the top of the canvas. - Use the icons in the contextual menu to align and distribute items as wanted.
Inspect a spec
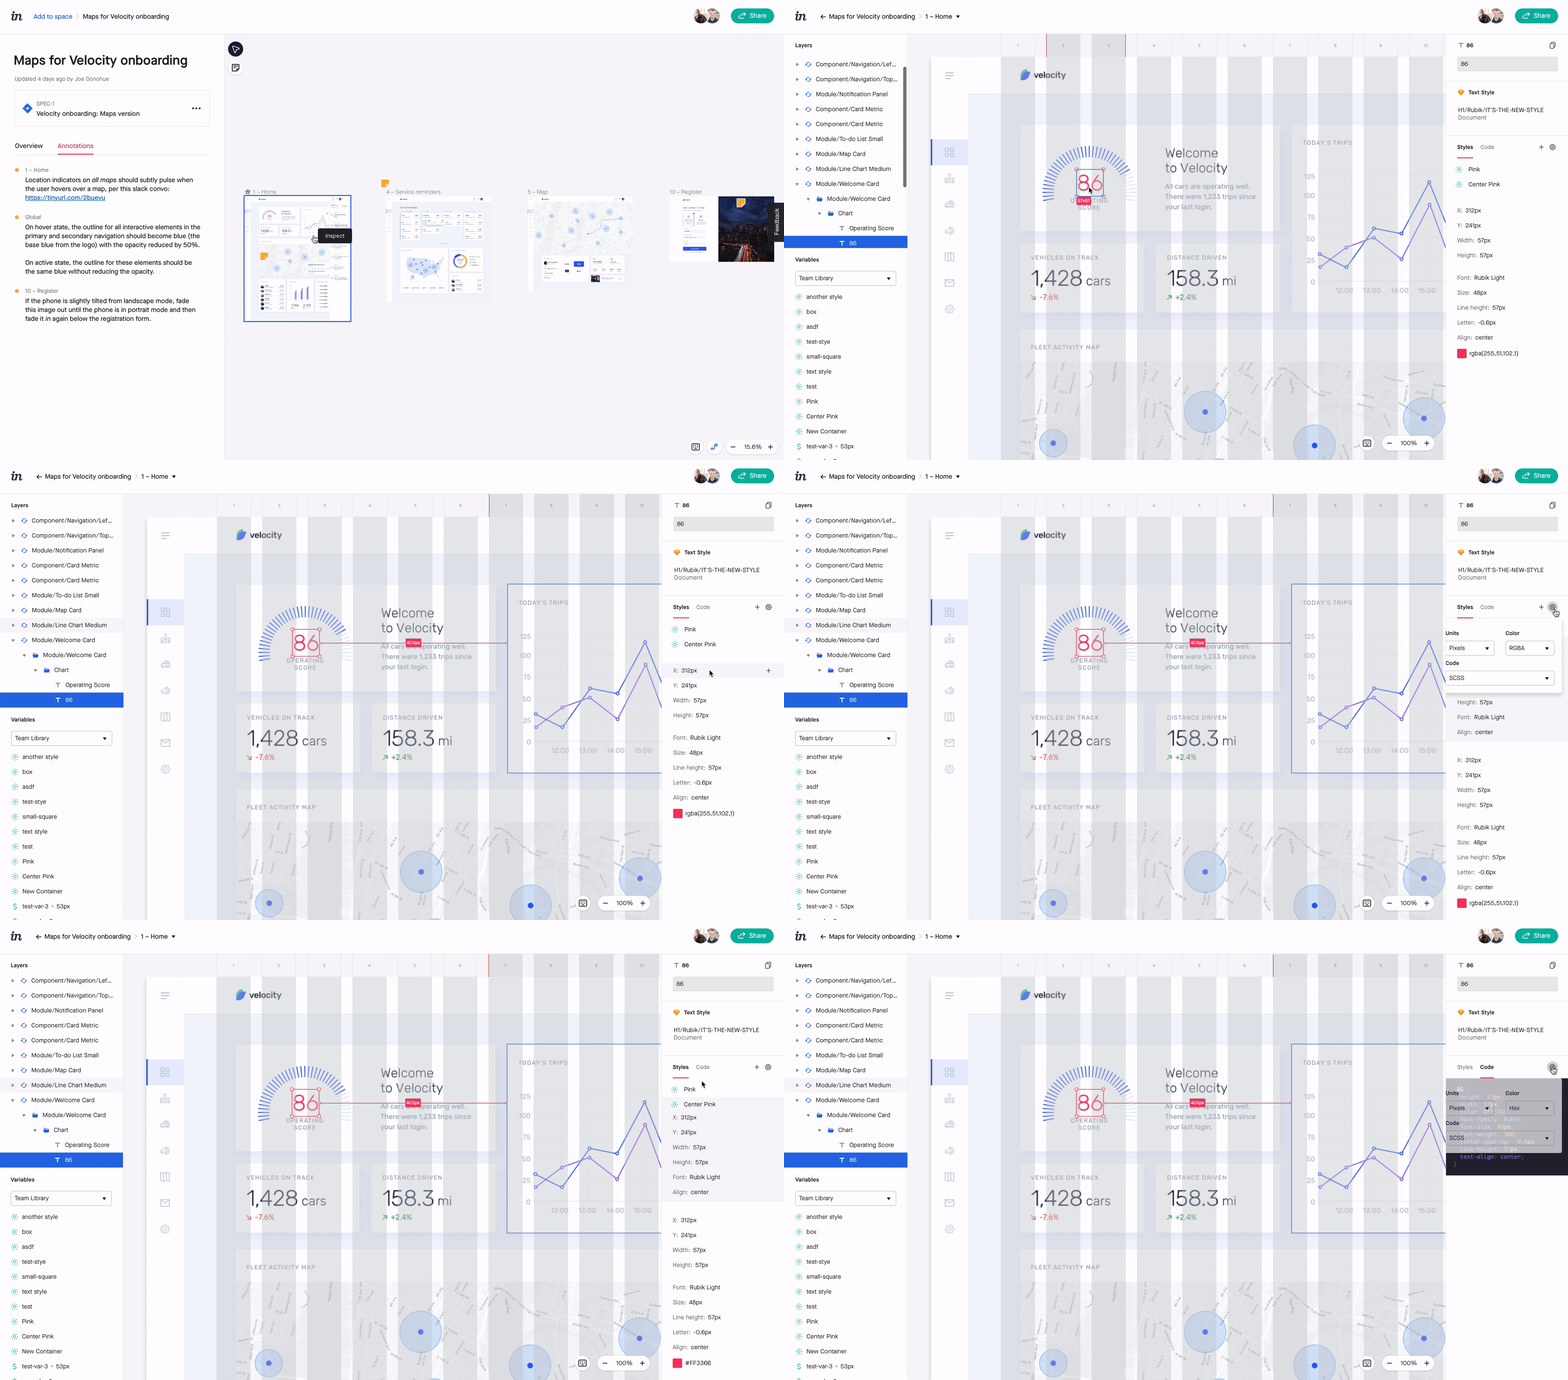
Developers and other viewers can quickly switch to Inspect mode in a spec to view development details for each screen. Immediate access to Inspect is especially useful when reviewing contextual comments from designers.
To inspect a screen within a spec:
- Click the selector icon (
 ).
). - Double-click any screen and inspect the details. Note: Inspect mode in a spec document is nearly identical to Inspect mode in a prototype, so you can access the same critical info while inspecting either document type (as seen in this quick peek at Inspect mode).

- When you're ready to return to the main spec view, click the back arrow (
 ) at the top-left of Inspect.
Link a spec to Jira
Developers can link each InVision spec to a specific Jira ticket, making it all the more convenient to reference the spec while they're building.
There are two Jira integrations for InVision specs:
- Jira Cloud
- Jira Server and Data Center
Once someone links a spec to Jira, your team will collaborate as usual in the spec file on InVision, yet your developers will have immediate access to the latest updates for the spec within either Jira Cloud or Jira Server and Data Center.
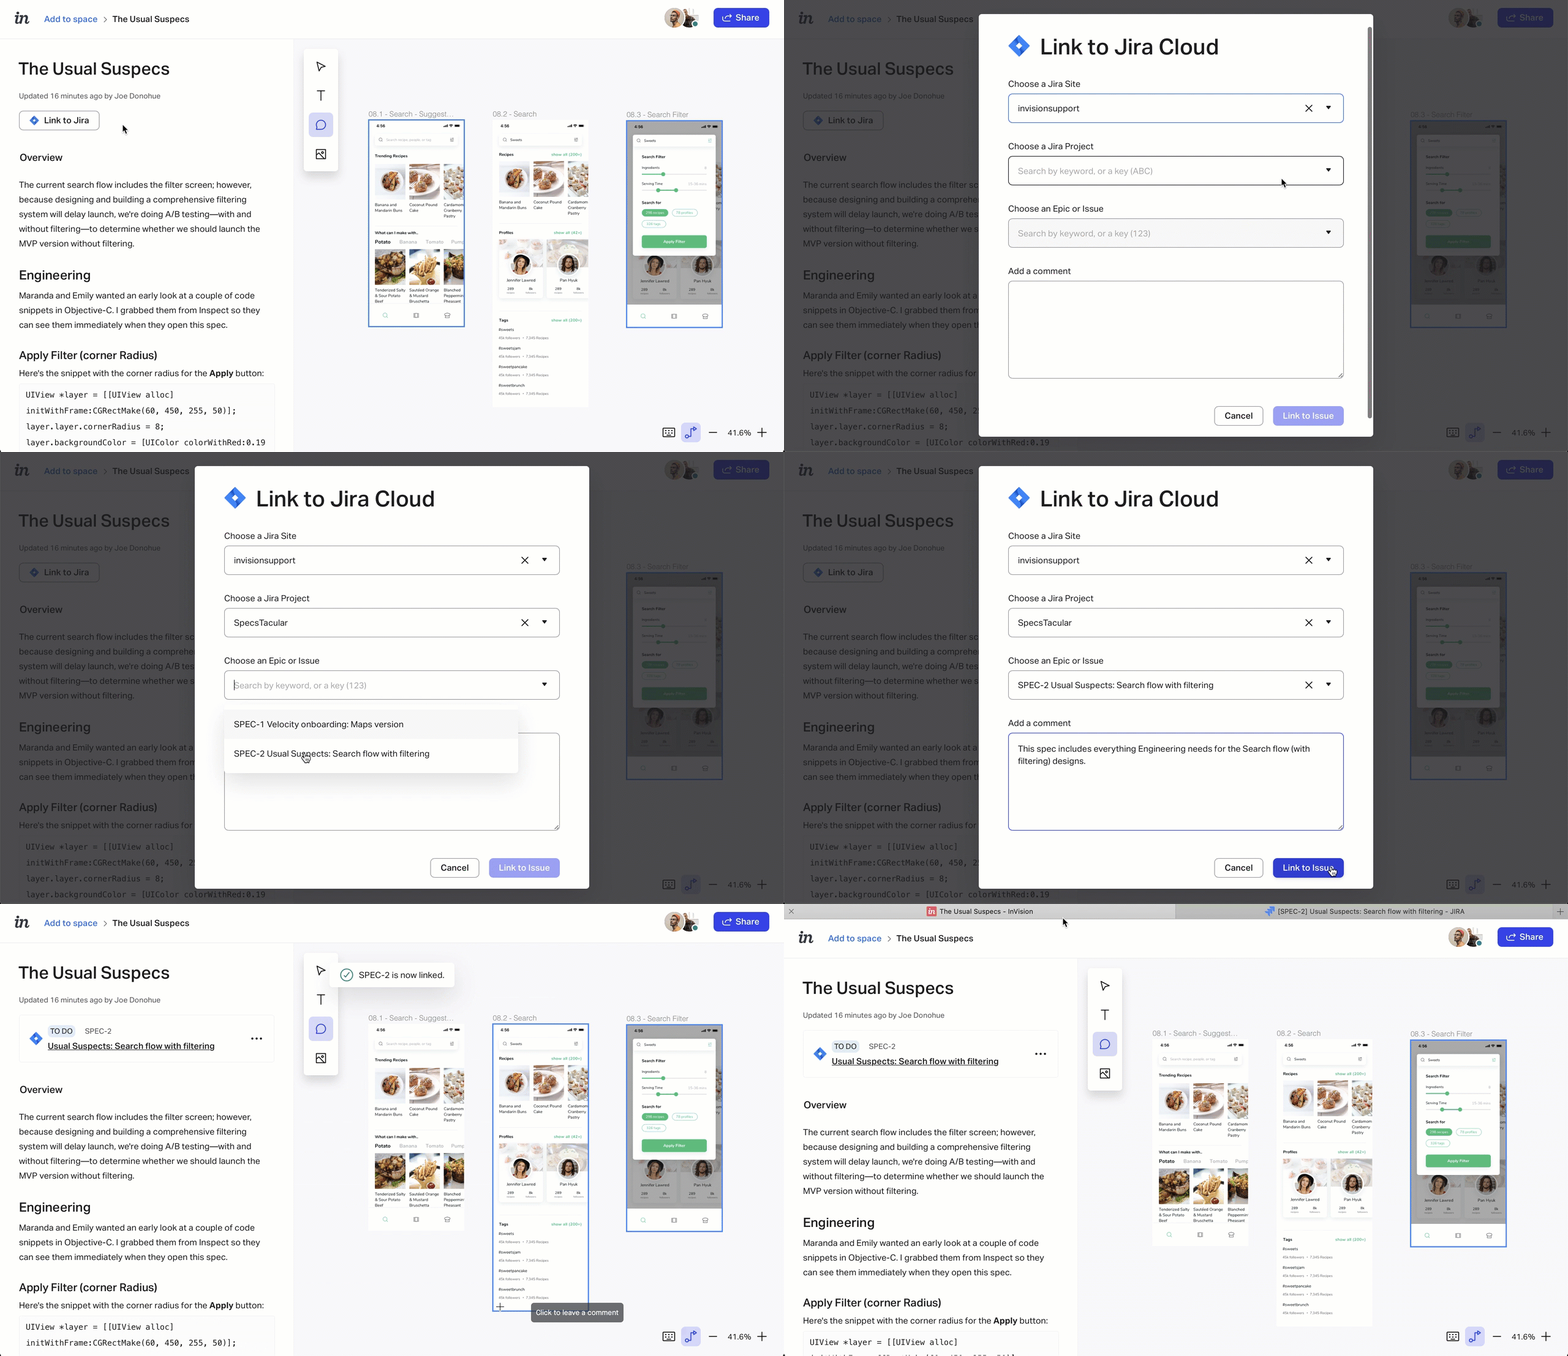
Link spec to Jira Cloud
To link a spec to Jira Cloud:
- Open the spec in InVision V7.
- Just above the Overview heading on the right panel, click Link to Jira.
- In the Jira Cloud box of the Integrations modal, click Link Issue.Note: If you cannot access your Jira site, you'll need to request access: At the bottom of the modal, click Authorize. Your Jira admin will get notified via email, and we recommend following up with the admin to ensure that they authorize you to connect.
- Select your Jira site, project, and epic or issue, and then add a comment.
- Click Link to Issue.

To open the spec in Jira, click the link you created:

Link spec to Jira Server and Data Center
To link a spec to Jira Server and Data Center:
- Open the spec in InVision V7.
- Just above the Overview heading on the right panel, click Link to Jira.
- In the Jira Server and Data Center box of the Integrations modal, click Link issue.
- In the Link to Jira Server and Data Center modal, click the Choose a Jira Site dropdown, and then enter and/or select the appropriate Jira URL. Note: If you cannot access your Jira site, you'll need to request access: At the bottom of the modal, click Authorize. Your Jira admin will get notified via email, and we recommend following up with the admin to ensure that they authorize you to connect.
- Select your Jira project and your Jira epic or issue.
- If wanted, add a comment, and then click Link to Issue.
.gif)
To open the spec in Jira, click the link you created:


 ) at the top-left of Inspect.
.gif)