- 05 Jan 2023
- 2 Minutes to read
- DarkLight
Highlighting comments in prototypes
- Updated on 05 Jan 2023
- 2 Minutes to read
- DarkLight
This article provides answers for InVision V7. If you’re on InVision V6, read this article instead. Not sure which version you're using? Find out now.
When you can't be there to walk viewers through a prototype yourself, providing important context is still no problem thanks to highlighted comments:

An InVision V7 feature, highlighted comments establish visual comment markers that grab viewers' attention, letting them quickly find and read contextual clues when viewing prototypes in Play mode via a public share link.
If the viewer is signed in to InVision when viewing a prototype in Play mode, they will not see highlighted comments.
The ability to highlight prototype comments provides two ways to improve collaboration and communication:
- Create a navigational guide: Use highlighted comments as a tour guide to direct viewers through the prototype and provide context about screens or specific interface elements.
- Establish comment categories: Use highlighted comments to categorize topics for streamlined internal communication.
Adding highlighted comments
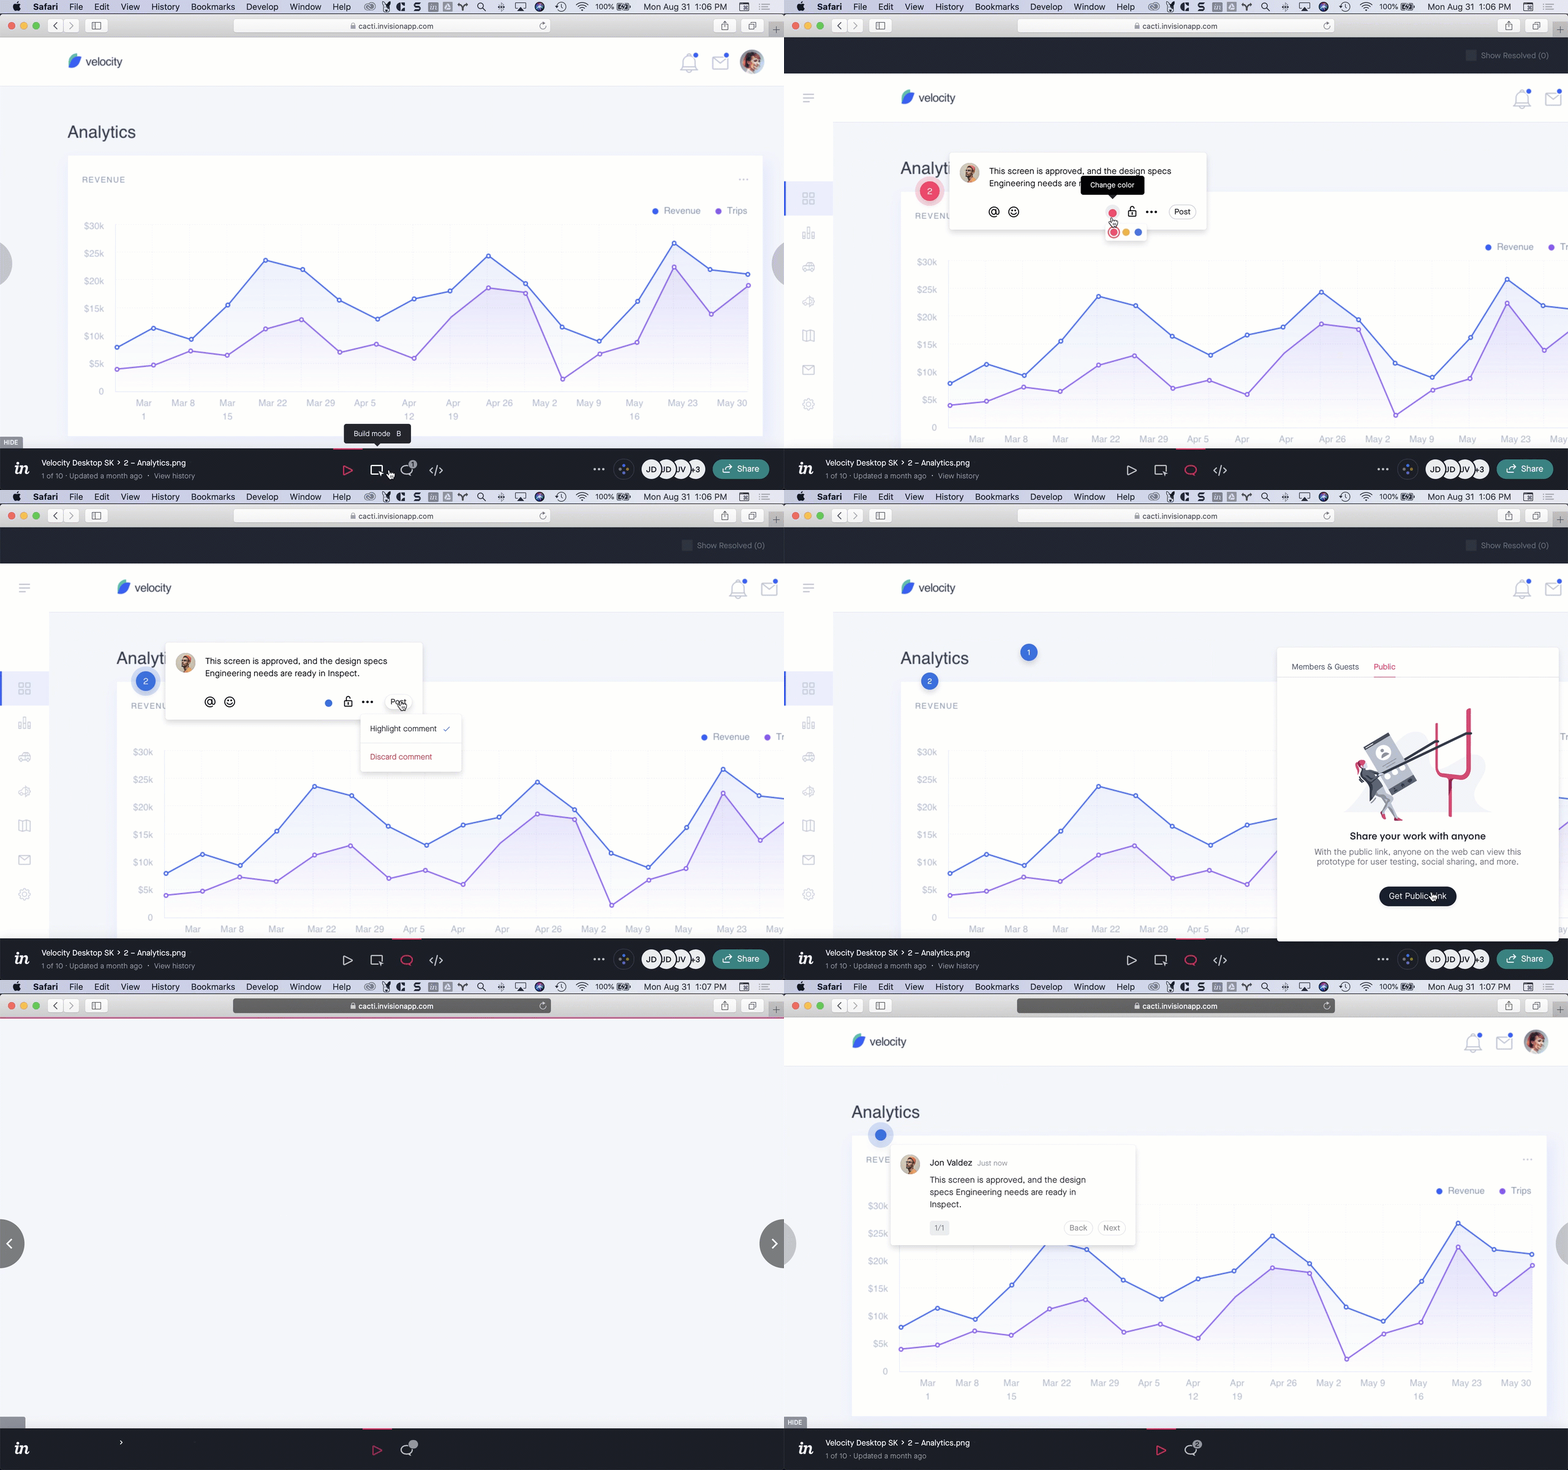
To add a highlighted comment to a prototype you have open:
- At the bottom of the InVision console, click the comment icon (
 ) or use the shortcut C.
 - Click anywhere on the screen and begin typing in the comment field, using the @ symbol to tag specific users if wanted.
- Click the comment color dropdown and select the color you want to apply: pink, yellow, or blue
- Click the More options menu icon (•••), and then click Highlight comment.
- Click Post or use the shortcut Command + Enter.

To highlight an existing comment, simply open in the comment, click the More options menu icon (•••), click Highlight comment, and then click Post.
Color-coded comments
Currently, you can set V7 prototype comments, whether public (![]() ) or private (
) or private (![]() ), to pink, yellow, or blue. Many teams use each color to indicate a specific topic or purpose for the given comment, and the option to highlight comments provides twice as many categories.
), to pink, yellow, or blue. Many teams use each color to indicate a specific topic or purpose for the given comment, and the option to highlight comments provides twice as many categories.
As one use case for color-coded comments, a standard blue comment might indicate a designer's notes for development, whereas a highlighted blue comment could be reserved to alert developers that a screen is approved and ready for handoff; standard pink might signal that the comment is for general communication with designers, and highlighted pink could be used to request design changes; and so on.
Similarities and differences with Tour Points
If you updated to InVision V7 after previously using InVision V6, you'll notice the functionality of highlighted comments is similar to the Tour Points feature from V6. This similarity is by design.
Highlighted comments meet the need for creating tour guides, which was the original intent for V6 Tour Points. The improved V7 iteration of the feature also establishes a more effective way to categorize comments—something that many V6 teams had used Tour Points to accomplish.
There are a few other differences to note between highlighted comments and V6 Tour Points as well:
- You're free to apply any comment color to highlighted comments, whereas blue is the only option for V6 Tour Points.
- To improve the ability to categorize comments, the color of a highlighted comment in V7 does not indicate whether it has been resolved, whereas resolving a Tour Point comment in V6 changed the color.
- Unlike V6 Tour Points, highlighted comments are not placed in sequential order; therefore, it isn't possible to reorder them.

