Using screen labels for InVision V7 prototypes
- 05 Jan 2023
- 7 Minutes to read
- DarkLight
Using screen labels for InVision V7 prototypes
- Updated on 05 Jan 2023
- 7 Minutes to read
- DarkLight
Article Summary
Share feedback
Thanks for sharing your feedback!
This article provides answers for InVision Cloud V7. If you’re on Cloud V6 of InVision, read this article instead. Not sure which version you're using? Find out now.
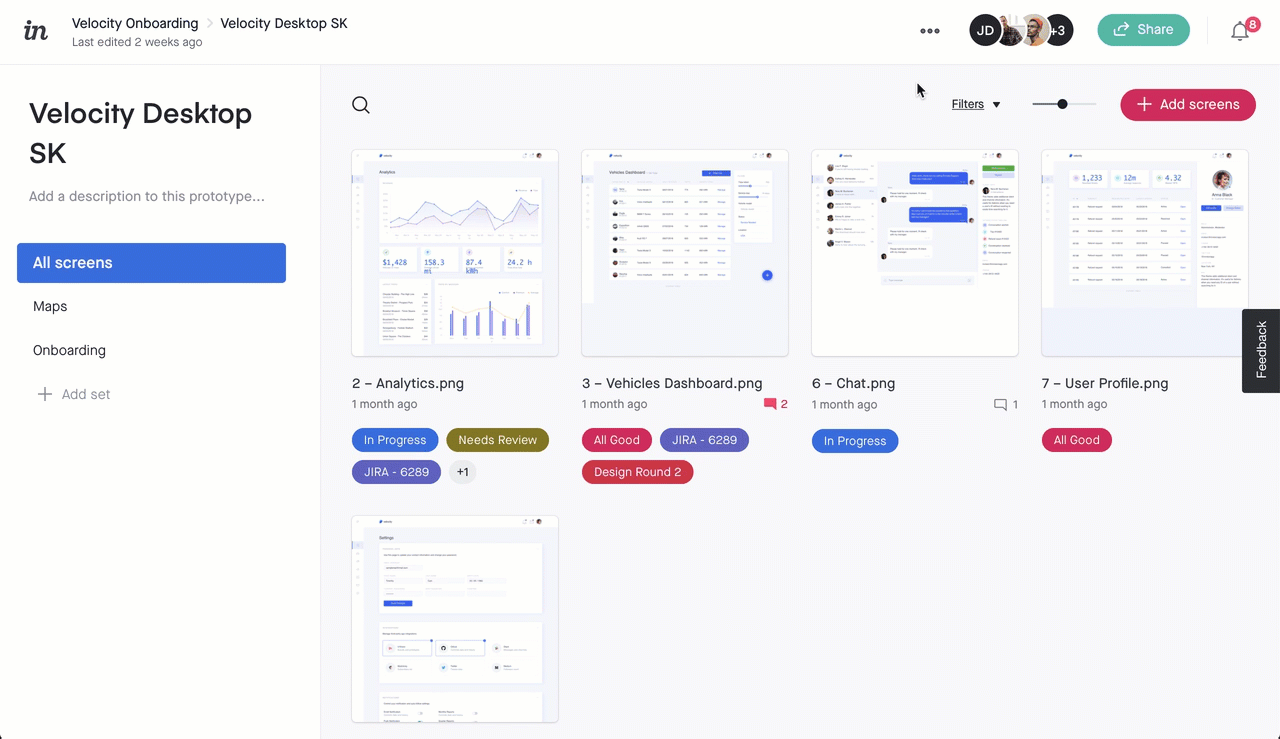
Prototype screen labels in InVision V7 let you create customizable filtered views and easily share links to each view. Editors of an individual prototype can manage the labels available for that prototype as well as create new labels, like Jira milestones, and edit the names and colors of the labels in our starter set: In Progress, Needs Review, or Approved

Typical use cases for screen labels include:
- Organizing large sets of documents
- Managing design approvals and the current status of screens
- Reducing clutter and distractions for stakeholders who only need to view certain screens
Tip:
If you're new to InVision V7 and used Workflow in InVision V6, you can use screen labels for the same purpose!
Key uses
The three major goals listed above provide a nice high-level view of what you can accomplish with screen labels, but what about individual tasks? Screen labels are designed for a handful of key uses.
Organize screens with labels
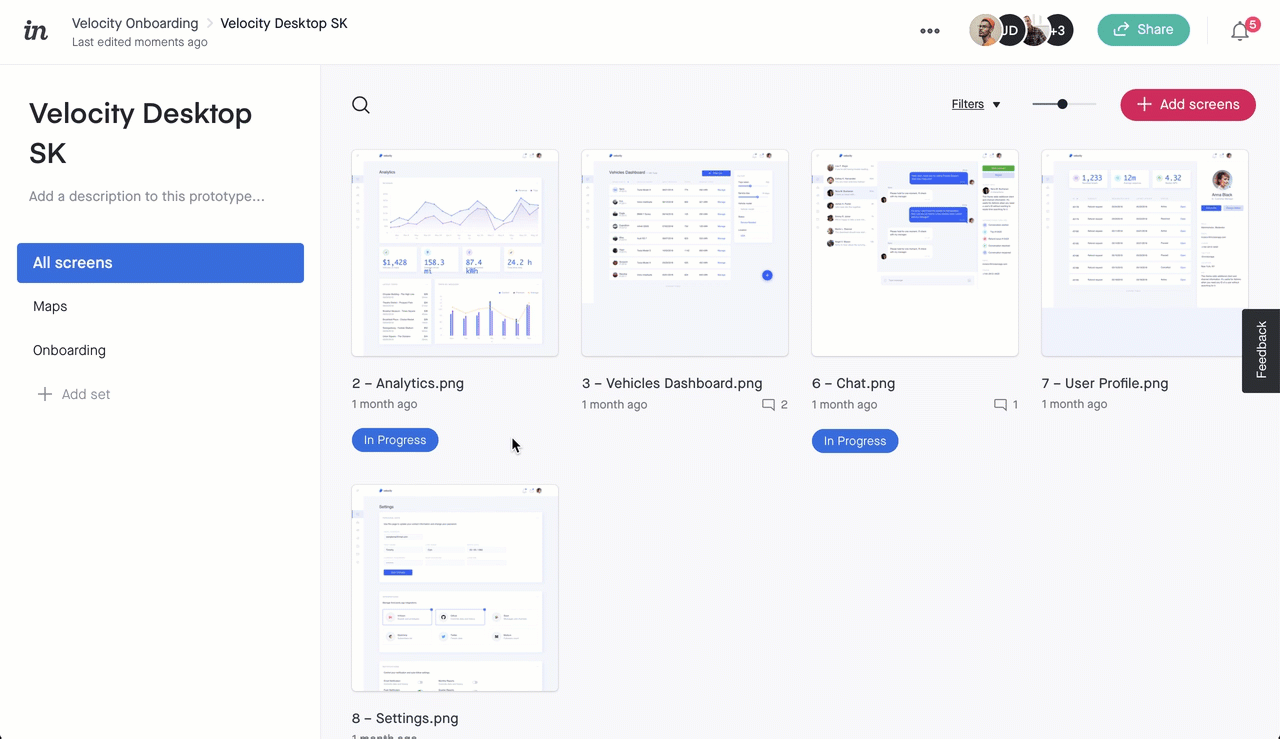
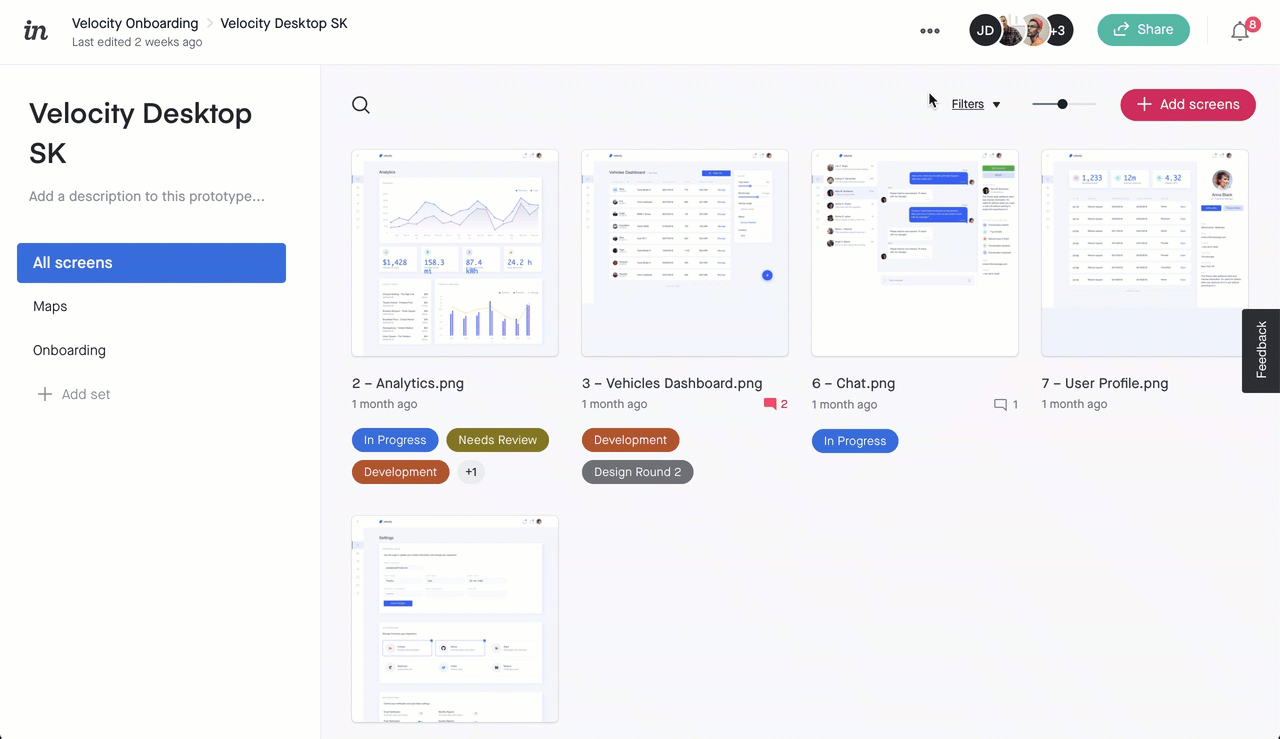
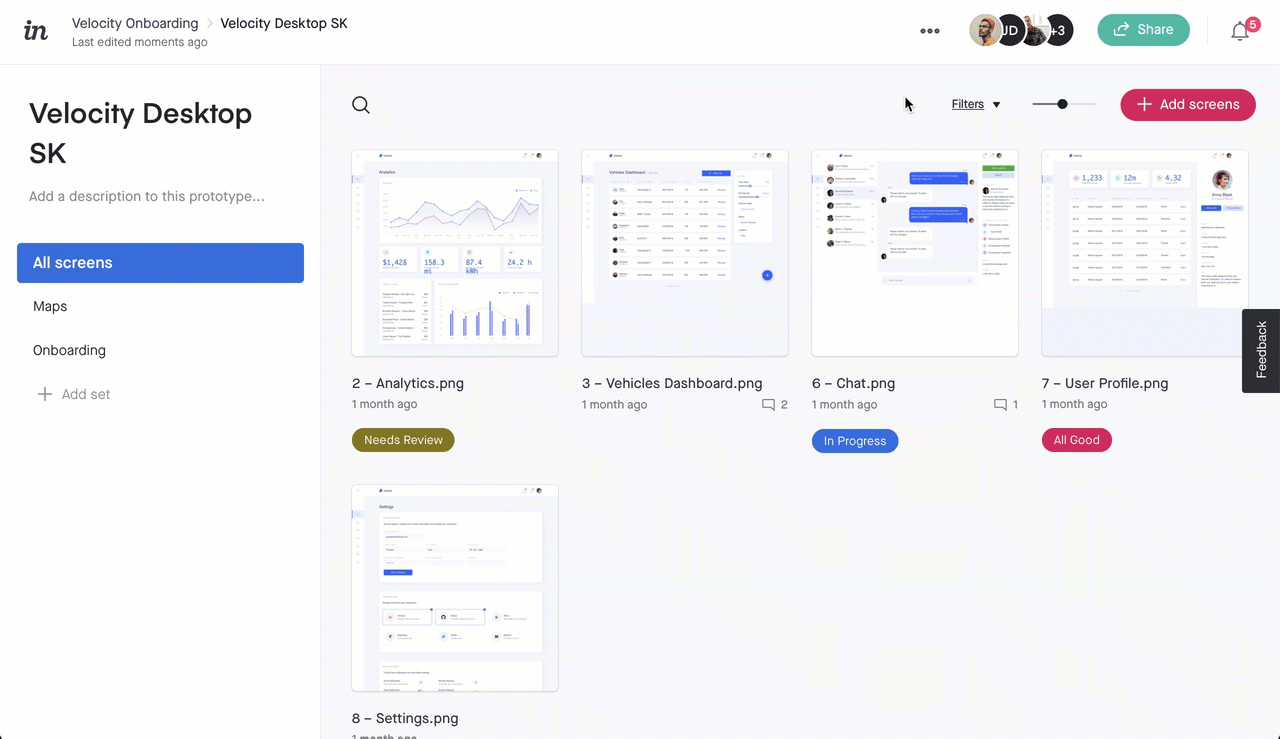
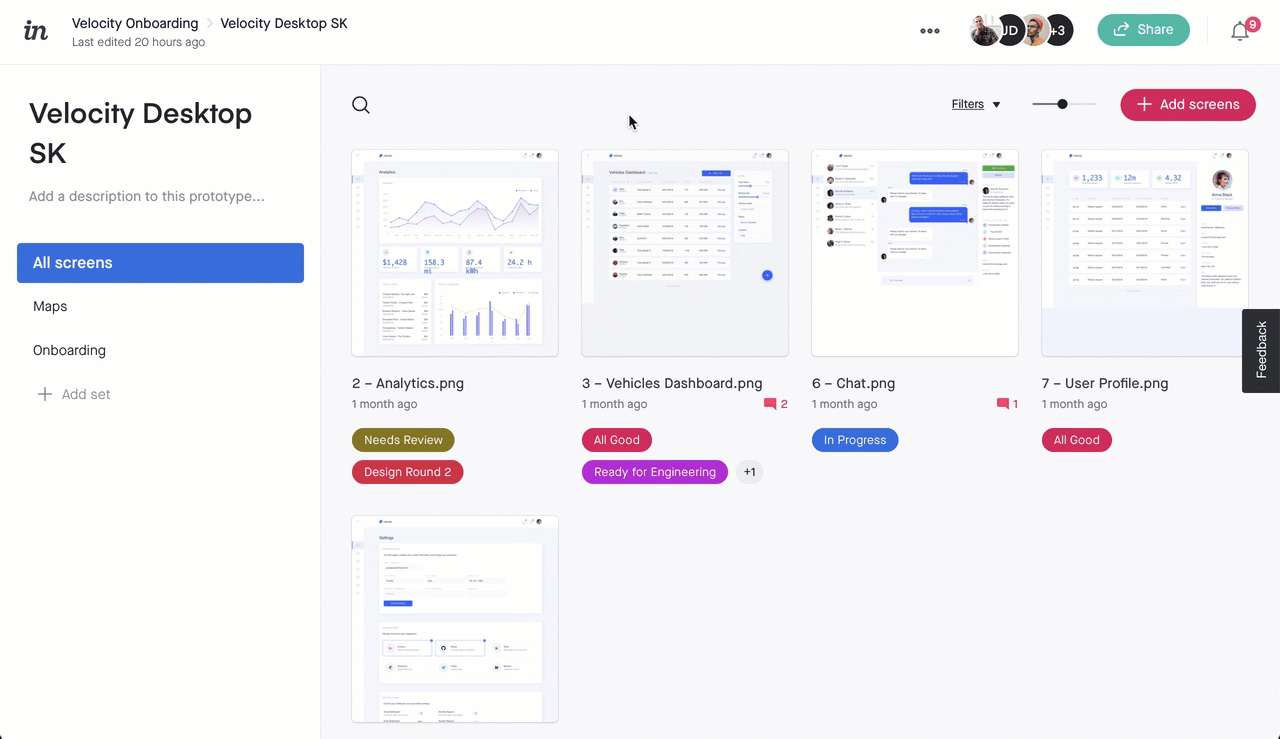
Quickly tag your screens with preset or custom labels to indicate status, Jira epic, or other relevant information to your team.
To apply an existing label (preset or custom) to a screen on the Screens overview page:
- Hover over the screen thumbnail to reveal and click the More menu icon (•••).
- Click Manage labels.
- In the Manage labels dialog, select In Progress, Needs Review, Approved, or one of your team's custom labels.

To toggle screen labels on or off for a specific screen, follow steps 1 and 2 above, click the label/s you want to toggle, and then verify that the checkmark has been added or removed:
- If you see a checkmark, the label is toggled on:

- If you don't see a checkmark, the label is toggled off:


Manage labels
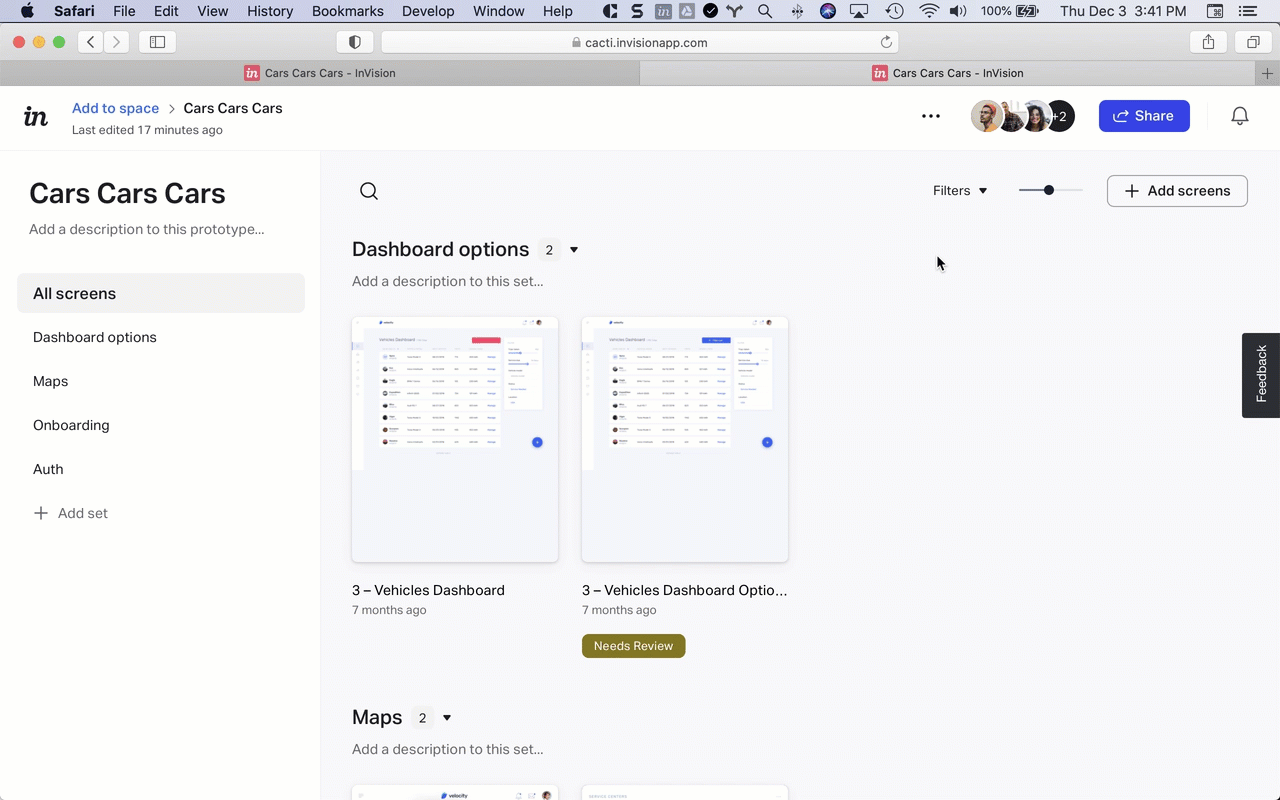
Access labels management from the Filters dropdown or selected screens to edit or create additional labels for you and your team to use.
Editing labels via the Filters dropdown
To edit an existing screen label via the Filters dropdown on the Screens overview page:
- Just below the collaborators' avatars, click Filters.
- Click Manage.
- In the Manage labels dialog, click the pencil icon on the label you want to edit.
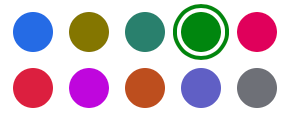
- In the Edit labeldialog, change the name and/or color:
- Click the round color icon, and then select the color you want.
- Delete the current name and enter a new name.
- Click Save.

Creating new labels via the Filters dropdown
To create a new screen label via the Filters dropdown on the Screens overview page:
- Just below the collaborators' avatars, click Filters.
- Click Manage.
- In the Enter label field of the Manage labels dialog, enter a name for the label.
- To the left of the name, click the round color icon, and then select the color you want.
- Click Create.

Managing labels while screens are selected
To select one or more screens and then manage labels:
- On the Screens overview page, hover over a screen thumbnail to reveal and click the selection icon in the top-left corner.Once you've selected the screen, the other screens in the prototype will also become selectable.
- In the toolbar that appears at the bottom of the browser window, click Manage Labels.
- In the Manage labelsdialog, edit or create a label:
- Edit: Click the pencil icon on the label you want to edit, update the color and/or name, and click Save.
- Create: In the Enter label field, enter a name for the label, click the round color icon and select a color, and then click Create.

Deleting labels via the Filters dropdown
To delete an existing screen label via the Filters dropdown on the Screens overview page:
- Just below the collaborators' avatars, click Filters.
- Click Manage.
- In the Manage labels dialog, click the pencil icon on the label you want to delete.
- In the Edit label dialog, click the Delete button.
- Click the second Delete button to confirm your choice.

Filter screens by labels
Filter screens by available labels to quickly find specific screens—including screens that have any combination of labels and the Has comments or Has unread comments filters.

Share label-filtered screens for specific feedback
There are two ways to share a group of screens that's been filtered by labels in InVision V7:
- Document link
- Public share link
Share a document link to label-filtered screens
To copy and share a document link to your group of screens:
- Just below the collaborator avatars on the screens overview page, click the Filters drop-down.
- Click the appropriate label.Note: To apply multiple filters, select each label.
- At the top right, click Share.
- Click the Members & Guests tab.
- To the right of Copy link, click Settings.
- In the Manage sharing settings modal, select options for the Who can open this document? and What can they dosettings.Unfamiliar with these settings? Learn more about document link settings or about global team sharing settings.
- Click Save.
- Back in the share dialog, click Copy Link, and share the URL as wanted.

Share a public share link to label-filtered screens
Remember, anyone with a public share link URL can view the screens anonymously—without signing in to your team or InVision. If you enable comments in the public share link settings, however, viewers must sign in before commenting.
To create a public share link to your label-filtered group of screens:
- Just below the collaborator avatars on the Screens Overview page, click the Filters drop-down.
- Click the appropriate label.To apply multiple filters, select each label.
- On the canvas, hover over a screen and click the selection icon in the top-left corner.
- In the toolbar that appeared at the bottom of the canvas, click Select all.
- Click the share icon (
 ).
). - Click Update public link settings, configure each setting, and click Done.If you want your public link viewers to see the name of the screen set, toggle off the Hide InVision UI setting. If the InVision toolbar is hidden, viewers will not see the name of the set.
- Click Copy.
- Share the URL for the set as wanted.

 ).
).
Primary users
Screen labels are perfect for managing design visibility and status within design teams, and they can be used between designers and developers to conveniently tie screens to specific engineering milestones or Epics.
While all collaborators on a prototype benefit from screen labels, these user types are most likely to use screen labels often:
- Managers: Product managers, project managers, design leads, and similar roles
- Key prototype collaborators: Designers, developers, and decision-making stakeholders
Managers
With screen labels, managers and design leads can conveniently approve changes and track the status of individual screens or UI elements. This makes it a cinch to tie individual screens or design initiatives to development milestones.
Key prototype collaborators
Screen labels are also extremely useful for designers and other collaborators. Along with indicating the current status of designs, screen labels also let designers, developers, and other collaborators quickly tag numerous screens with the Needs Review label (or whatever name you choose for the label) rather than suffer through the hassle of selecting and sharing each screen.
Access and limitations
Access and limitations to what you can do with screen labels depends on whether or not you have editing permissions for the specific prototype.
Prototype editors
If you're an editor on the prototype, in addition to everything that authenticated users can do (see below), you can completely manage screen labels:
- Add or remove individual screen labels on the Screens overview page.
- Manage labels on individual screens in the InVision Console (e.g., Play, Build, or Comment mode).
- Tag screens using our starter set of labels: In Progress, Needs Review, Approved
- Create new labels for the prototype.
- Delete labels from the prototype.
- Edit label names.
- Select or change the label color, using one of 10 color options.

Authenticated users
If you're an authenticated user with access to a given prototype, you can do the following with screen labels for that specific prototype:
- See what labels are applied to individual screens on the Screens overview page.
- Filter screens, using labels on the Screens overview page:
- Click any label in the grid.
- Click the Filters dropdown.
- Share filtered views by selecting the filters you want to apply and then copying the browser URL, which will change based on the filters you select.
- View labels applied to an individual screen in the InVision Console (e.g., Play, Build, or Comment mode).
- See screen labels that correspond to any Workflow statuses that had been assigned to the same prototype screens in InVision V6, before moving the prototype to InVision V7.
Conversion of Workflow statuses to V7 screen labels
If an InVision V6 prototype contains either of the following, its Workflow statuses will be converted to corresponding screen labels—with identical names—when updating to InVision V7:
- One or more screens with a status other than In Progress
- One or more screens with a custom status applied
InVision V6 prototypes that have neither a custom status nor an In Progress status applied will be updated to InVision V7 without any pre-defined screen labels. This behavior is designed to avoid auto-tagging screens with the In Progress label, which would cause potential inaccuracies since the In Progress status is automatically applied to all screens in InVision V6 if Workflow has been used on the prototype.
Was this article helpful?