Adding interactive hotspots to InVision V7 prototypes
- 07 Jun 2023
- 7 Minutes to read
- DarkLight
Adding interactive hotspots to InVision V7 prototypes
- Updated on 07 Jun 2023
- 7 Minutes to read
- DarkLight
Article Summary
Share feedback
Thanks for sharing your feedback!
This article provides answers for InVision V7 To confirm your version, check the upper right corner of your dashboard. On V6? Check out this article instead. | 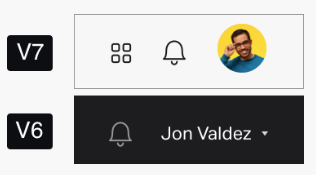 |
Creating hotspots
Hotspots are links within a screen or between screens that let your stakeholders explore your design as a fully interactive prototype, providing a more realistic user experience when reviewing.
Create a hotspot
To add a hotspot to your prototype:
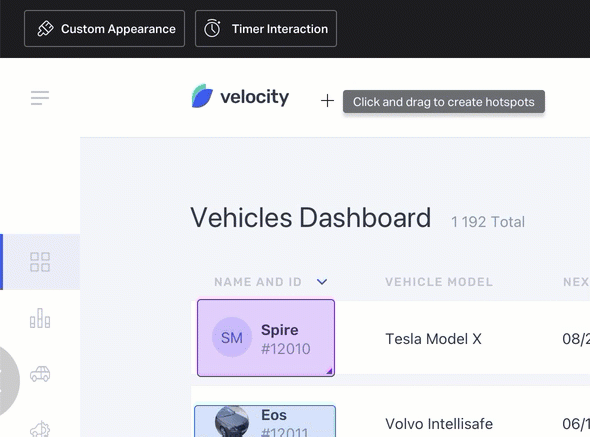
- In InVision V7, open any screen that needs a hotspot.
- In the toolbar at the bottom, open the Build mode (
.png) ) or use the keyboard shortcut:
) or use the keyboard shortcut: B - Click and drag a blue box around the area you want to be interactive.
The hotspot modal will open so you can complete steps 4 - 8.
- Click the Link To dropdown and select the destination. Learn more about the available options in the Select a link destination section below.
After you set the destination, the Trigger and Transition dropdowns will appear.
- Click the Trigger dropdown and select which trigger will prompt the hotspot.
- Click the Transition dropdown and select the type of animation you want to use.
- If needed, select one of the settings checkboxes:
- Scroll to anchor point on transition: Check this box if you are linking to another prototype screen using an Instant or Dissolve transition and want to land on a specific anchor point in the target screen. If you don't choose this option, clicking the hotspot will take the user to the top of the target screen.
- Maintain scroll position after click: Check this box if you are using an Instant or Dissolve transition and don't want the scroll position to reset after the hotspot is clicked; if you choose to maintain scroll position, the user will be taken to the same point on the destination screen.
- Include hotspot in template: Check this box if you want to duplicate hotspots across multiple screens. Learn more in the Creating hotspot templates section below.
- Click Save.
.png) ) or use the keyboard shortcut:
) or use the keyboard shortcut: 
Select a link destination
When creating a hotspot, you can point the link to numerous types of destinations:
- Another point on this screen: Create an anchor link that points elsewhere on the same screen you have open.
- Link Back / Close: Create a link to the screen the user last visited.
- Screen as Overlay: Create an overlay link to simulate modal windows, dropdown menus, and other on-screen prompts—all without leaving the currently selected screen.
Tip: Screen overlays are extremely popular, because they're extremely useful. Check out this article to learn the finer points: Using overlays in InVision V7
- Previous Screen in Series: Create a link to the screen directly to the left of the currently selected screen when viewing all screens in the expanded thumbnail tray.
- Next Screen in Series: Create a link to the screen directly to the right of the currently selected screen when viewing all screens in the expanded thumbnail tray.
- External URL: Create a link to a separate website URL.
- Prototype Screens:Link to another screen in the prototype.
Tip: You can link to an anchor point on a different screen for Instant and Dissolve transitions.
Select the trigger type
A trigger is an action a user needs to perform in order to initiate the interaction. Choose one of the following triggers:
- Click
- Double Click
- Hover
- Drag Right
- Drag Left
- Drag Up
- Drag Down
For a more immersive, realistic experience, hotspots in mobile prototypes get prompted instead by the following triggers:
- Tap
- Double Tap
- Swipe Right
- Swipe Left
- Swipe Up
- Swipe Down
Select the transition type
A transition defines the animation effects that occur when users interact with a hotspot. Select one of these transitions for each hotspot you add:
- Instant
- Dissolve
- Push Right
- Push Left
- Slide Right
- Slide Left
- Slide Up
- Slide Down
- Flip Right
- Flip Left
- Flow
- Pop
- Slide Dissolve
Resizing an existing hotspot
You can’t resize a third-party (green) hotspot in Build mode. To resize a third-party hotspot, you need to edit it in your design tool, then sync the screens once again.
To resize a hotspot you’ve already created:
- Open the appropriate screen in Build mode ().
- Click the hotspot to activate the resizing handles.
- Click and drag the resizing handles as desired.
.gif)
.gif)
Deleting a hotspot
To delete a hotspot:
- Open the appropriate screen in Build mode ().
- Click the hotspot and, in the modal that opens, click Delete.
You can also delete a hotspot by clicking the hotspot and, at the top of the page, clicking Delete.
Selecting and editing multiple hotspots
You can’t edit a third-party (green) hotspot in Build mode. To edit a third-party hotspot, you need to edit it in your design tool, then sync the screens once again.
To select and edit multiple hotspots at once:
- Open the appropriate screen in Build mode ().
- Click one of the hotspots you wish to edit.
- You can select the following options at the top of the page:
- Select all: use this option to select all hotspots in the current screen.
You can also select multiple hotspots in the screen by holdingCmd(on macOS) orCtrl(on Windows) and clicking the hotspots you want to edit. - Clear: use this option to deselect the selected hotspot(s). You can also use the
Esckey in your keyboard to clear your selection. - Delete: use this option to delete the selected hotspot(s). You can also use the
DeleteorBackspacekey in your keyboard to delete the selected hotspot(s).
- Select all: use this option to select all hotspots in the current screen.
- Once you’ve selected multiple hotspots, click one of the hotspots and drag them to move them to the new position.
You can also use the arrow keys to move the selected hotspots. The arrow keys will move the hotspots in the given direction by 1 pixel. If you holdShiftwhile using the arrow keys on a selection, the selected hotspots will move 10 pixels..gif)
.gif)
Note: It’s not possible to select hotspots across different screens. If you move to a different screen, the current hotspot selection will be cleared.
Creating hotspot templates
You can save time and energy using hotspot templates. When screens share common links, you only have to create hotspots for them on one screen, and then you can add those hotspots to a template. From there, you'll be able to apply that hotspot template to the rest of your screens. You can assign a new or existing hotspot to a template.
To set up and apply hotspot templates:
- Create a hotspot.
- In the hotspot modal, select the Include hotspot in template checkbox.
- Click Create (if creating a new template) or select a pre-created hotspot from the dropdown.
- Click Save.
- Repeat the above steps for any additional templated hotspots on this screen.
Once you've added all the hotspots to your template on that screen, go to any other screen. From the templates dropdown, select the checkbox next to the template.
You can also apply a template across multiple screens at once. To apply a hotspot template in bulk:
- Open a screen in Build mode ().
- Near the top of the browser window, click the hotspot template dropdown arrow.
- Hover over the hotspot template name and click the lightning bolt (
 ) icon, which will open a screens drawer—just above the toolbar at the bottom of the browser window.
 - Select all the screens you want to apply the template to, and then click Done.
Overlays
An overlay is a link type that lets you link to another screen as an overlay, rather than as a separate destination screen. Overlays can simulate modal windows, drop-down menus, and other on-screen prompts—all without leaving your current screen.
You can learn more about overlays here: Using overlays in InVision V7
Anchor points
You can create hotspots that act as an anchor link to a specific scroll position, either on the same or a different screen.
You can learn more about anchor points here: How do I link to an anchor point on my V7 prototype?
.gif)
Timed redirects
When you set up a timed redirect on a hotspot, you can define the time duration that passes before the screen triggers a transition and opens the destination screen.
To set up a timed redirect on one of your screens:
- Open the appropriate screen in your prototype, and enter the Build mode ()
- Just above the top of your prototype screen, click the button Timer Interaction.
- Click the Automatically Redirect To dropdown arrow and select your destination screen.
Note: Alternatively, click Browse to open your screen thumbnail drawer and select the destination screen there.
- In the After text field, enter the time duration (in milliseconds) you want to pass before the transition is triggered.
- If working with a mobile prototype, click the Transition dropdown and click the transition effect you want.
- Click Save.

To turn off the timed redirect, click the the Timer Interaction button again, and then click Turn Off. Timed redirects within an overlay (animated or static) aren't supported today, but this is something that we're considering for the future.
Was this article helpful?